09 May Foliage Renderer Deluxe Shader – Documentation
FoliageRenderer Deluxe Shader is a feature rich, super efficient Shader. Fully compatible with Foliage Renderer and all Render Pipelines. Get ready to draw even more Terrain Details even faster. Generally, this Shader is designed with natural elements you might find on an exterior Terrain in mind. But you could use it on anything.
FoliageRenderer Deluxe Shader is designed to give you more efficient Terrain Detail rendering and complete Foliage Renderer support out of the box. With all the options easy to modify in a digestible, compact Inspector, getting all of your Details looking great has never been easier.
The FoliageRenderer Deluxe Shader will work on any Renderer or Terrain Detail, even if you aren’t using Foliage Renderer to optimize your Detail drawing (if you aren’t… you should be!)
Technical Support
Technical Support is handled via the Dicewrench Designs’ discord group. Please read the documentation before seeking support, as many questions are already answered within.
Shader Feature Overview
FoliageRenderer Deluxe Shader Includes these rendering features, presented neatly in a user friendly Custom Material Inspector:
- Culling Mode
- ZWrite Toggle
- ZTest Mode
- Double Sided Normal Mode
- Distance Based Mesh Scaling
- Y Offset
- Align Mesh to Terrain Shape (FR Required)
- Vertex Wind Motion (FR Required)
- Vertex Perspective Bend
- Interactivity Bend
- Mesh Normals Modes (Standard, Brush, Sphere, Up)
- Alpha Modes (Opaque, Cutout, DitherFade)
- Near Camera Fading
- Distance Camera Fading
- Glancing Edge Fading
- PBR Sliders (Metalness, Smoothness, Occlusion)
- OPTIMIZED Texturing Modes (UltraLite, Standard, 5 Packed Standard Variants, Expensive)
- Albedo Tinting (with Noise and Texture support)
- Normal Strength
- Overlay Color Masking with 4 Mask Modes
- Emissive Texture Support with 2 Mask Modes
- Terrain Albedo Blending with 4 different Blend Modes (FR Required)
- Wetness
- Frost
- SubSurface Scattering (Simple and Complex Modes)
- Saturation Controls
- Debug Display (Vertex Color preview and Keyword usages)
Package Contents
Shader
You get the Foliage Renderer Deluxe Shader. You can find it in the Shader selection rollout in any Unity Material under FoliageRenderer/Deluxe.
You get all of the custom BetterShaders Stackable shaders used to make the Deluxe Shader.
You get a Foliage Renderer compatible Wind Controller to drive the Wind settings for your Deluxe Shader Materials.
You get the Interactable System components for pushing your Deluxe Shader Materials around.
RP Shader Remapper
The RP Shader Remapper allows you to create ScriptableObjects that change Materials’ Shader based on the Render Pipeline of the current project. Additionally it will remap Shader Property values, for example: a Standard Shader will be changed to the Universal Render Pipeline/Lit Shader and the _MainTex texture will be assigned to the _BaseMap. This happens automatically when the Editor Loads and code recompiles for any Remappers in the Project that have their ‘Enabled’ checkbox selected. You can always Remap on demand by selecting the Remapper object and clicking the ‘Apply Remap’ object
One Shader Remapper object is included in the Package to handle URP and HDRP conversions for you automatically for the example Assets (Standard Shader to their RP equivalents).
You can make additional Shader Remappers via Create > Foliage Renderer > RP Shader Remapper.
Additional Packages
Additional packages that include further examples but have additional dependencies. You can read more about these below.
Setup
After adding the package, all you need to do is select any Material you want to use the Deluxe Shader. Click the Shader selection dropdown. And choose ‘FoliageRenderer/Deluxe’.
The Deluxe Shader’s Material Inspector is divided into a number of Foldout regions to make it easier to navigate and find associated effects. Some additional Properties can be exposed if you want to work outside of the FoliageRenderer Eco-System and don’t have TerrainFoliageProviders on your Terrain to populate Texture Data for you. This is also useful if you want to work off of pre-generated Mesh Terrains, etc. To expose these options navigate to the Window > FoliageRenderer > Deluxe Shader > and Toggle on Expose Terrain Settings.
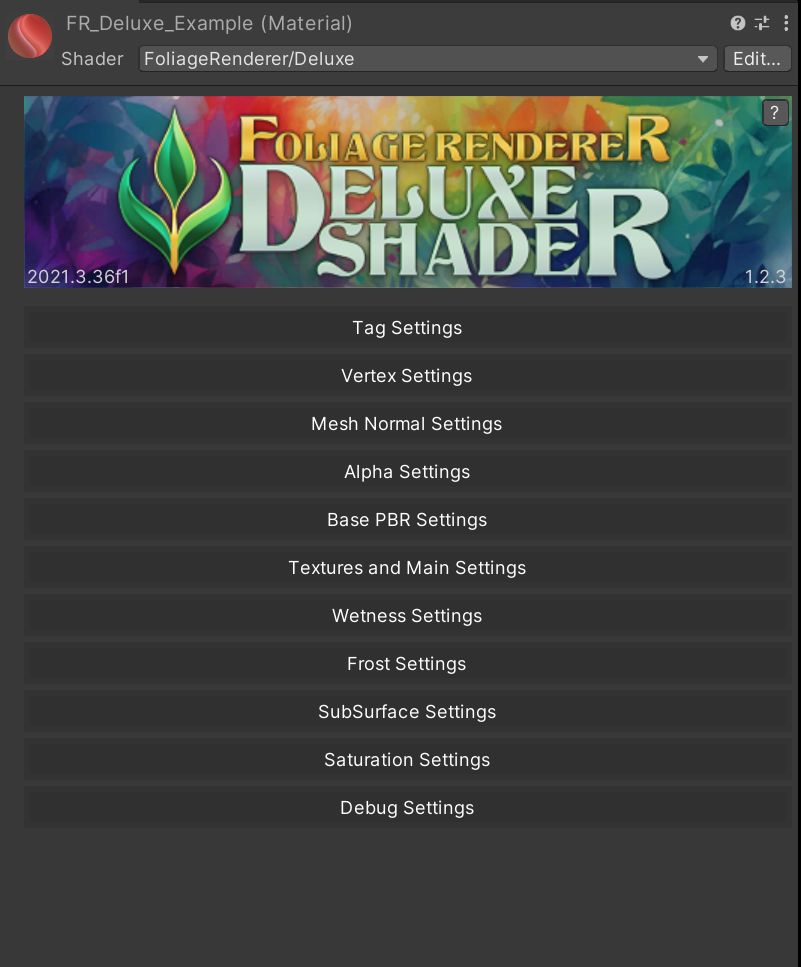 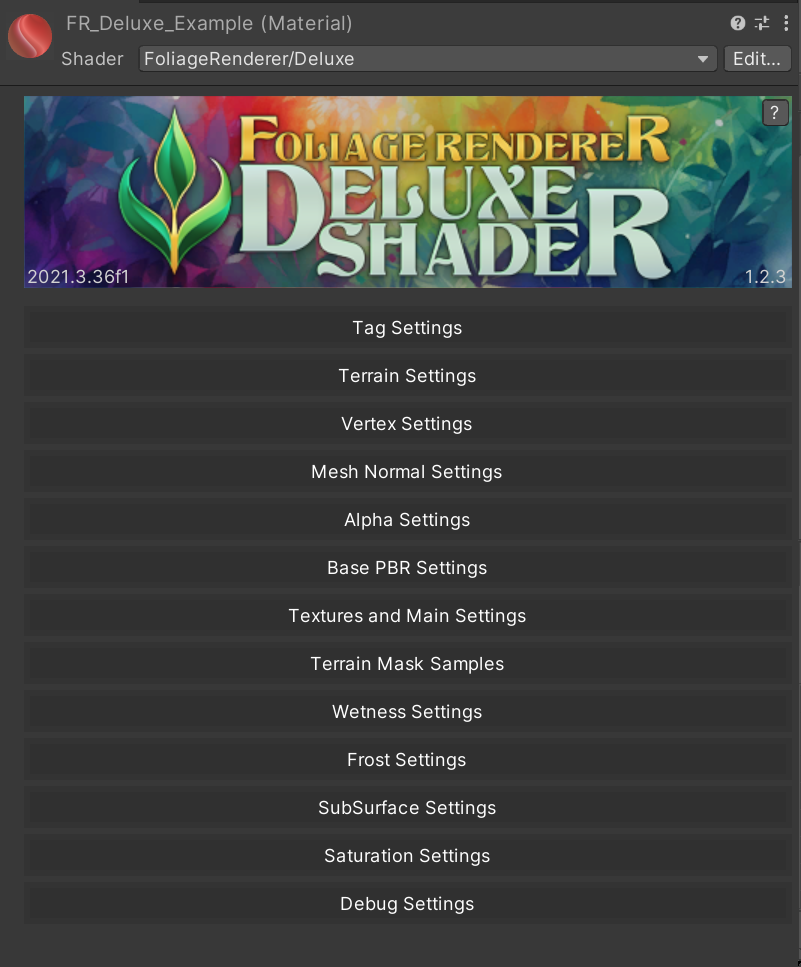 |
Tag Settings
Tag Settings contains the settings for properties that would normally reside in the “Tag” portion of a Unity Surface Shader.
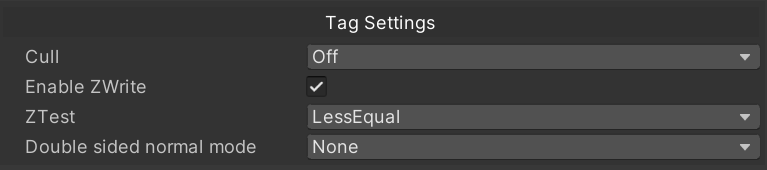
- Cull: Set the culling tag for this Material. Off, Back, or Front. Removes the selected faces from rendering.
- Enable Z Write: Toggle the Material Z Writing.
- ZTest: Set the ZTest enum for the Material.
- Double Sided Normal Mode: Important for Card based foliage elements, modifies normals for back faces. Options are: None (back faces use their regular normals), Mirror (back faces multiply their normal by negative one), Flip (back faces multiply just the z component of their normal by negative one)
Vertex Settings
Vertex Settings includes properties and modifiers related to changing the vertices of your rendered meshes.
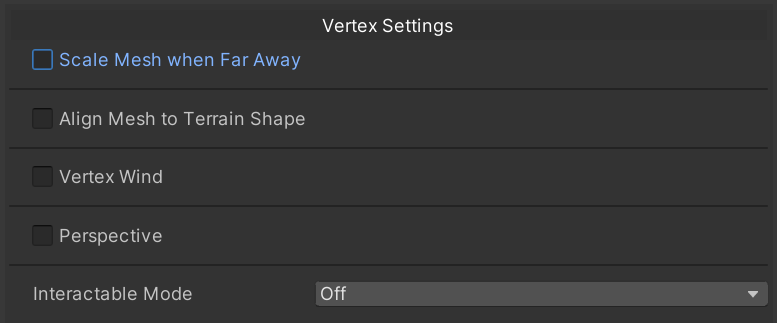
You can enable any of these features by checking their toggle on, or in the case of Interactable Mode, selecting an option from the enum dropdown other than Off.
When any feature is enable the corresponding settings for those features will be exposed… let’s take a closer look at each feature.
Scale Mesh when Far Away

This features scales meshes down toward their pivot point as they move away from the Camera. This is useful for hiding the edges of draw distances so details don’t abruptly cut off.
Align Mesh to Terrain Shape

Just like the feature in Foliage Renderer’s Lit Shader, this moves the vertices of your mesh to hug the provided height maps for your Terrain. Foliage Renderer can assign those maps for you automatically, or you can assign them yourself in the Material.
Vertex Wind
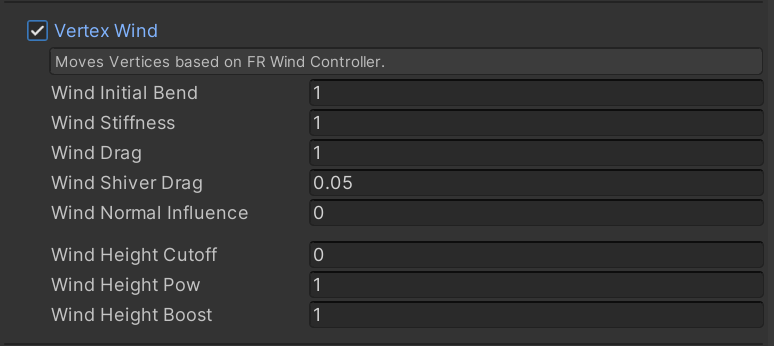
This features bends and flutters vertices based on the output from the Wind Controller Component in your Scene. Wind is updated by either the FRDS Wind Controller component or the Foliage Renderer Wind Controller component (only available if you also have Foliage Renderer). These two classes are interchangeable.
Perspective

Perspective bends a mesh down towards the Terrain, when the Camera is near and the Camera is looking down. This is useful with details like Grass, where you don’t want to look down onto the top of mesh cards.
Interactable Count

Interactable Count lets you choose how many Interactors this Material should consider. The more Interactors the more expensive the Material is to render! So try to use the smallest number necessary. You can read more about Interactable Components and Performance below. If you don’t need any Interactors to modify a Material set this to Off.
Interactable Mode lets you choose how Objects react to being interacted with.
- Wrap: Objects are pushed away from Interactors but wrap back around where they aren’t pushed.
- Bend: Objects are pushed away from Interactors along an arc from their pivot position, much like bending due to wind.
Mesh Normal Settings

Mesh Normal Settings gives you options for adjusting the Normals, used for lighting calculations, on the meshes using this Material.
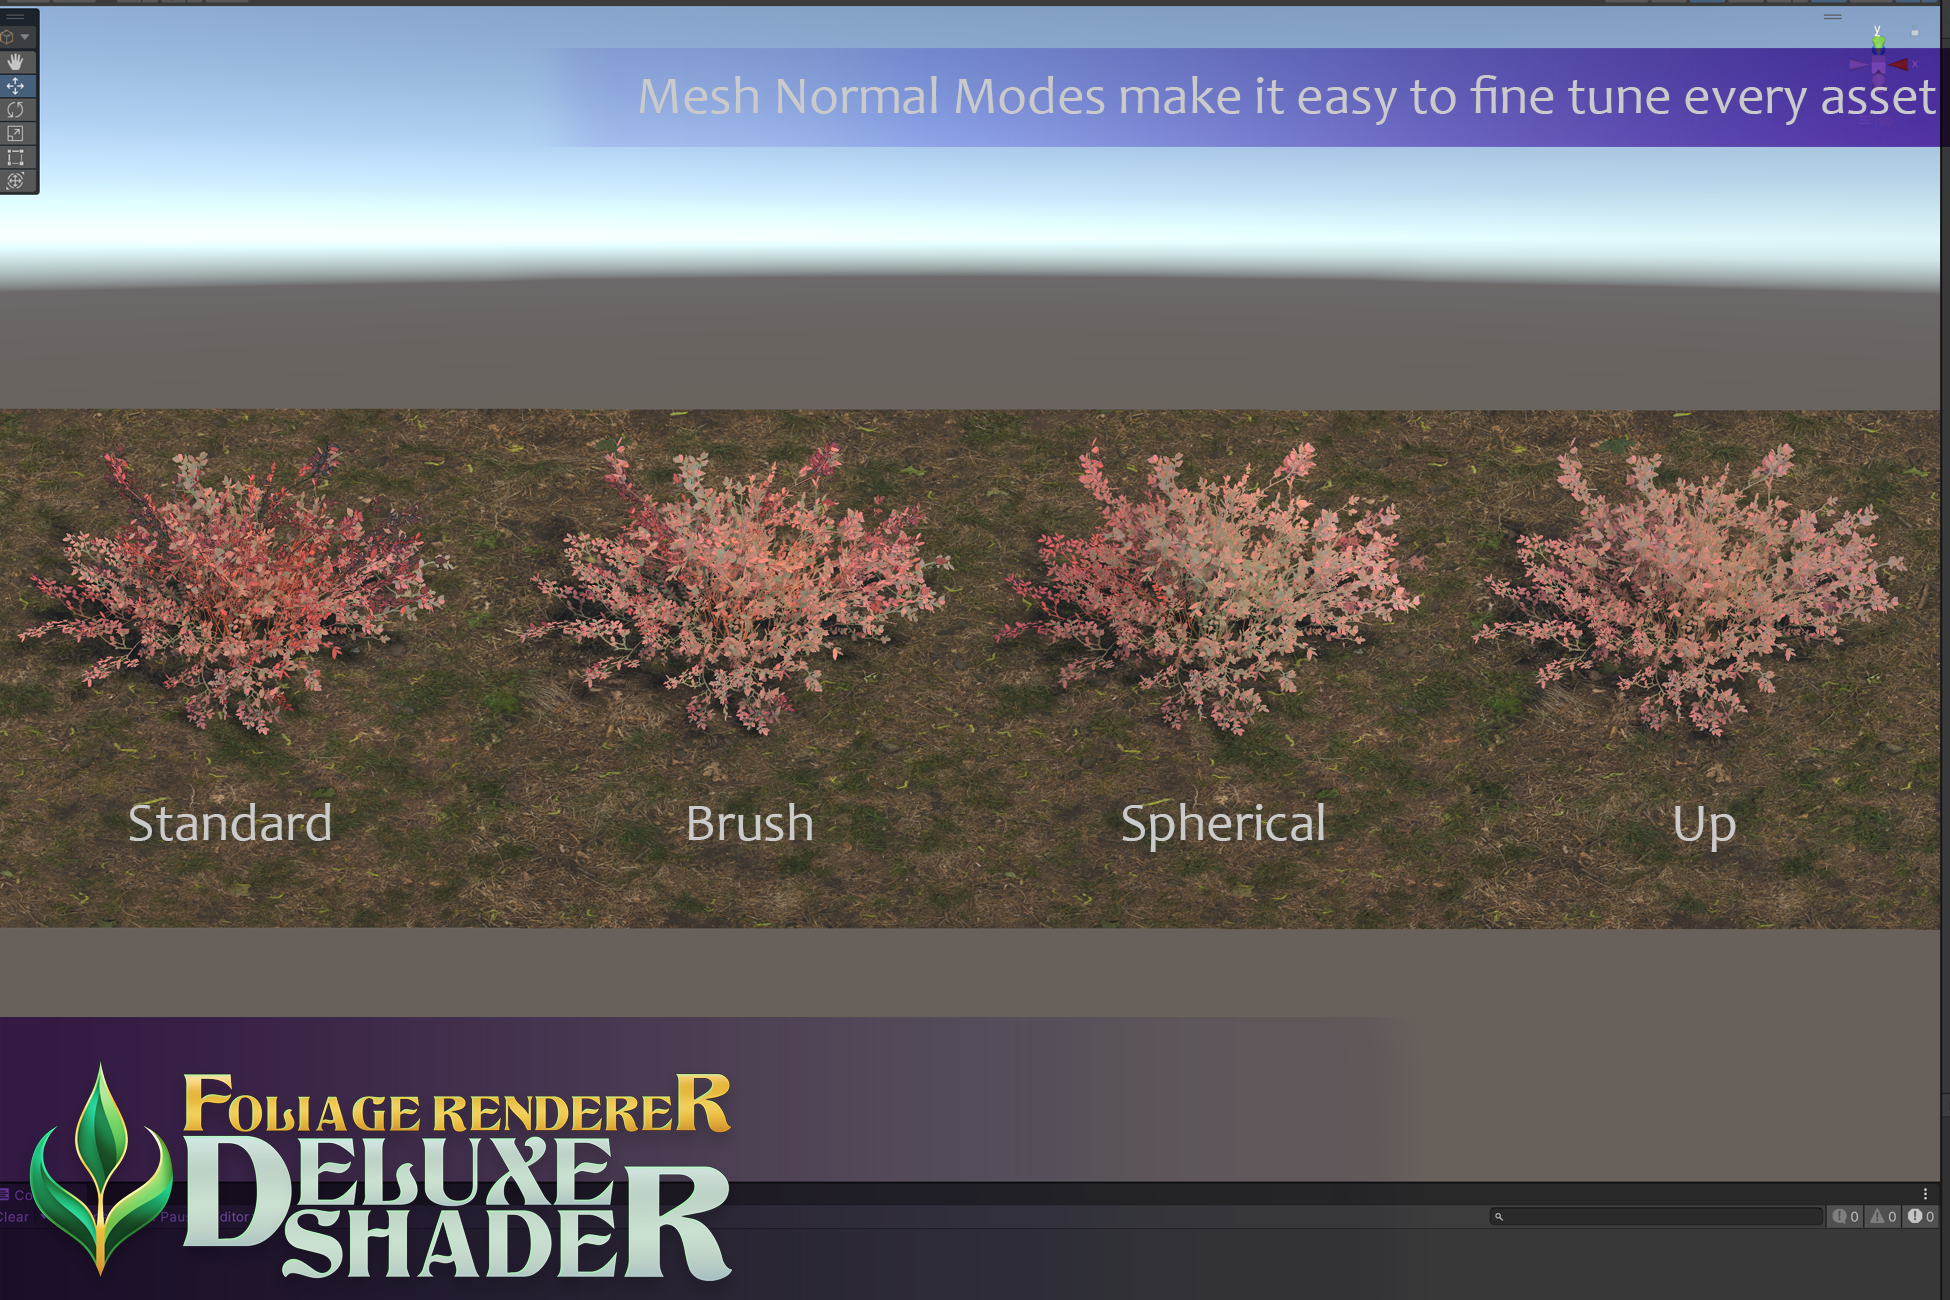
- Standard: Uses the existing Mesh’s normals.
- Brush: Lerps the existing normals half way to up at a 45 degree angle.
- Spherical: Normals are determined from the Object’s pivot point out to the vertex. This is good for stylized assets and shrubs.
- Up: Normals are pointed straight up in world space. This is best for grass and some stylized assets.
Alpha Settings
Here you can modify the Alpha Cutoff behavior of your Material. FRDS always draws as an opaque, clipped Shader to be compatible with Indirect Rendering. But you have a number of ways you can fine tune that result.

Alpha Mode
Choose the Alpha clipping mode to use for your Material.
- Off: Don’t clip.
- Cut: Clip
- DitherFade: Fades out the unclipped areas with a fast dithering solution.
Near Camera Fade

When Enabled, this fades out the Material when it is close to the Camera. When combined with noise this is a great way to “dissolve” Materials before the Camera intersects them producing harsh artifacts.
Far Camera Fade

When Enabled, this fades out the Material when it is far away from the Camera. This is another good solution for masking the edges of an Object’s Draw Distance.
Fade Noise

If either Near or Far Camera Fade are enabled you can toggle on ‘Apply World Noise to Fade’. This creates a 3d noise in World Space and applies it to these fade values.
- Noise Intensity: How much does the Noise effect the fade, generally you want just a little to wonk up the “edges” of the fade.
- Noise Contrast Power: How “harsh” or contrast-y the Noise is.
- Noise World Scale Mul: The frequency of the Noise; higher values will create finer grain noise, and lower values will create soft undulating noise.
Fade Out Glancing Edges

When enabled, this removes surfaces that are perpendicular to the Camera’s view direction. This is useful for hiding the edges of card based meshes, like grass.
Base PBR Settings

These sliders let you set the overall PBR values for your Material. Later stages may further modify the output but this sets the baseline.
Textures and Main Settings
This section is very important to the final result of your Material’s output and performance.
Texture Sampling is a fairly expensive part of your rendering. Each texture occupies space in memory and reading it within the Shader has a lot of overhead (relatively speaking). Unity’s “Standard” Shader has set us up to accept a lot of bad habits and become accustomed to using more textures than is necessary to produce a high quality result. I have been brought in to consult on many projects that use custom or asset store Shaders for rendering some key aspect of their game that are wasting texture samples, I remove these and immediately get huge performance gains.
For Example, if you used Unity’s Standard Shader and assigned Albedo, Normal, Metallic, and Occlusion textures, you’re doing FOUR Texture Samples and loading FOUR Textures worth of memory. In many cases, when dealing with Terrain Details, much of this data is wasted! No metallic information, homogenous Albedo or Smoothness information are all common (because that’s just how plants are), and these extra Textures are just wasting resources and making rendering more expensive.
The Deluxe Shader is designed to set you up for success and make it easy to add extra features like Emission, Overlay, Frost, etc. and still come out ahead on performance! The Shader gives you lots of different Texture strategies to pick from so you can choose what best fits your content and needs. And the Material Manager gives you free tools to pack your existing textures to fit whatever mode you choose.
Let’s take a look at each Mode…
UltraLite
UltraLite is a very efficient mode that only uses ONE Sample. It is great for stylized assets, small details (grass), filler details (underbrush), and distant LODs. UltraLite is extemely fast, and the best choice when your content allows you to use it.
UltraLite textures are packed as follows:
- Red Channel: Greyscale mask used to lerp between Albedo Color One and Color Two
- Green Channel: Normal Map X Channel
- Blue Channel: Occlusion Tex multiplied by the Alpha Mask
- Alpha Channel: Normal Map Y Channel
Standard
Standard Mode is, as the name would suggest, a fairly common strategy for texturing. It uses TWO Texture Samples. This is an easy way to get good results when you don’t need any sort of complex Smoothness or Metallic data.
Albedo + A Texture:
- RGB Albedo Color
- Alpha Channel: Alpha Mask
Normal Map
- RGB Normal Map
Standard Packed
Standard Packed, gives the most complete data set for your Material in the smallest form factor. If I wasn’t able to use UltraLite packing this would be my preferred Texturing strategy. It uses TWO Texture Samples.
Albedo + A Texture:
- RGB Albedo Color
- Alpha Channel: Alpha Mask
Data Pack Texture
- Red Channel: Smoothness Map
- Green Channel: Normal Map X
- Blue Channel: Occlusion Map
- Alpha Channel: Normal Map Y
Standard Smooth
Standard Smooth is a simpler version of Standard Packed that simply adds a Smoothness Map to the Normal Texture’s Alpha. It has less data for the same amount of Texture Memory as Standard Packed, but it easier to put together. It uses TWO Texture Samples.
Albedo + A Texture:
- RGB Albedo Color
- Alpha Channel: Alpha Mask
Data Pack Texture
- RGB Normal Map
- Alpha Channel: Smoothness
Standard AO
Standard AO is a simpler version of Standard Packed that simply adds an Occlusion Map to the Normal Texture’s Alpha. It has less data for the same amount of Texture Memory as Standard Packed, but it easier to put together. It uses TWO Texture Samples.
Albedo + A Texture:
- RGB Albedo Color
- Alpha Channel: Alpha Mask
Data Pack Texture
- RGB Normal Map
- Alpha Channel: Occlusion Map
Standard Trans
Standard Trans is a simpler version of Standard Packed that simply adds a Transmission Map to the Normal Texture’s Alpha. It has less data for the same amount of Texture Memory as Standard Packed, but it easier to put together. This is especially useful if you want a Transmission map for improving your SubSurfacing results. It uses TWO Texture Samples.
Albedo + A Texture:
- RGB Albedo Color
- Alpha Channel: Alpha Mask
Data Pack Texture
- RGB Normal Map
- Alpha Channel: Transmission Map
Expensive
Expensive Mode gives you complete data coverage but at the cost of an additional Sample. The name may sound harsh, but it does cost quite a bit more than the other modes even though its still faster than Unity’s Standard Shader. It uses THREE Texture Samples.
Albedo + A Texture:
- RGB Albedo Color
- Alpha Channel: Alpha Mask
Normal Map Texture
- RGB Normal Map
Data Pack Texture
- Red Channel: Albedo Tint Mask
- Green Channel: Transmission Map
- Blue Channel: Smoothness Map
- Alpha Channel: Occlusion Map
Common Settings
For each mode you will see some shared settings.
- Use UV 1?: Should this texture sample use Texcoord1 instead of Texcoord0?
- Tint One: HDR Color to Multiply onto the Albedo and Alpha output.
- Tint Two: HDR Color to Multiply onto the Albedo and Alpha output. This property is only available in UltraLite or Expensive Modes.
- Normal Strength: How intense should the Normal Map be applied? A value of 0 will be the same as no Normal Map, a value of 1 will be the intensity of the Normal Map as is, and a value greater than 1 will become more intense.
Overlay Color
Overlay Color Modes allow you to project a Color or Texture onto your Materials with some different Masking techniques.
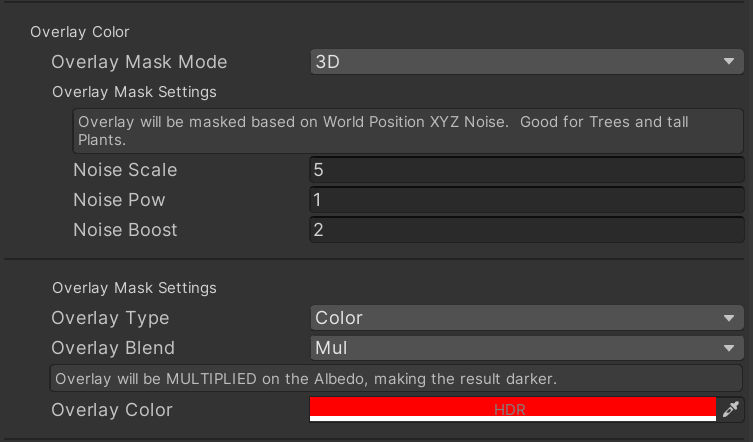
Overlay Mask Modes:
- Off: Overlay won’t be utilized.
- 2D: Creates a Noise pattern based on the World Space XZ position of the Mesh + any Offset. This is more efficient than using 3D Noise, so if you have short meshes, like grass, ferns, or other ground cover, use this.
- 3D: Creates a Noise pattern based on the World Space position XYZ position of the Mesh + any Offset. This is similar to 2D Noise but works better for tall plants like trees or tall shrubs.
- Height: Overlay is derived based on the Models Height + any Offset. This is ideal for tinting the bottoms of meshes.
- InvHeight: Overlay is derived based on the Models Height + any Offset, but then inverted. This is ideal for tinting the tops of meshes.
- Pivot: Overlay is derived based on the World Space XZ position of the Mesh’s Pivot point + any Offset. This is great if you want entire Trees, for example, to have uniform leaf color, but a different color than their neighbors.
- Radial: Overlay is derived based on distance from the World Space XYZ position of the Mesh’s Pivot point + any Offset. This is great if you want a stylized look for Trees or Shrubs.
Overlay Type:
- Color: Overlays an HDR Color
- Sample: Overlays a sampled Texture.
Overlay Blend:
This determines how the Overlay, Color or Texture, will be blended with the Albedo.
- Mul: Multiplies the Overlay onto the Albedo.
- Add Adds the Overlay onto the Albedo.
- Overlay: Overlays (think Photoshop Overlay, so darker values make things darker and light values make things brighter) the Overlay onto the Albedo.
- Replace: Lerps the Overlay onto the Albedo.
Overlay Offset:
Vector3 position added to any Overlay Mode “pivot point” calculations.
Emission
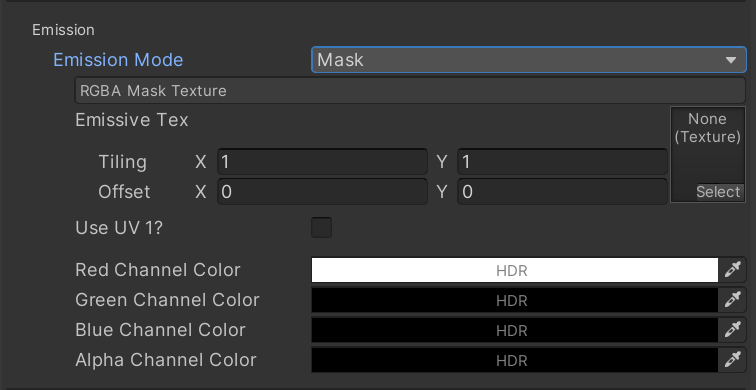
Emission Mode:
- RGB: Uses an RGB Texture Sample and adds it onto the Emission output.
- Mask: Uses an RGBA Texture Sample, masks Four HDR Colors onto the R, G, B, and A channels of that sample and then adds them onto the Emission output.
Terrain Albedo
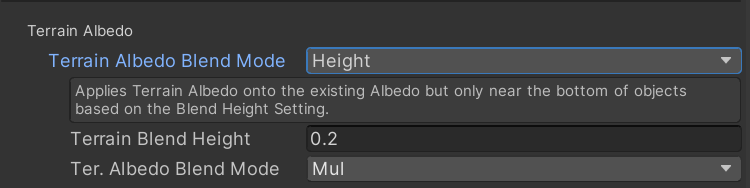
Terrain Albedo Mask Mode:
- Off: Disable this feature.
- Uniform: Combines the Terrain Albedo map with the Albedo across the entire Mesh.
- Height: Combines the Terrain Albedo map with the Albedo, but blends it in from the bottom of the Mesh only.
Ter. Albedo Blend Mode:
- Mul: Multiplies the Terrain Albedo map onto the Albedo, making the results darker.
- Add: Adds the Terrain Albedo map onto the Albedo, making the results brighter.
- Overlay: Overlays (think Photoshop Overlay, so darker values make things darker and light values make things brighter) the Terrain Albedo map onto the Albedo.
- Replace: Lerps the Terrain Albedo map onto the Albedo.
Wetness Settings
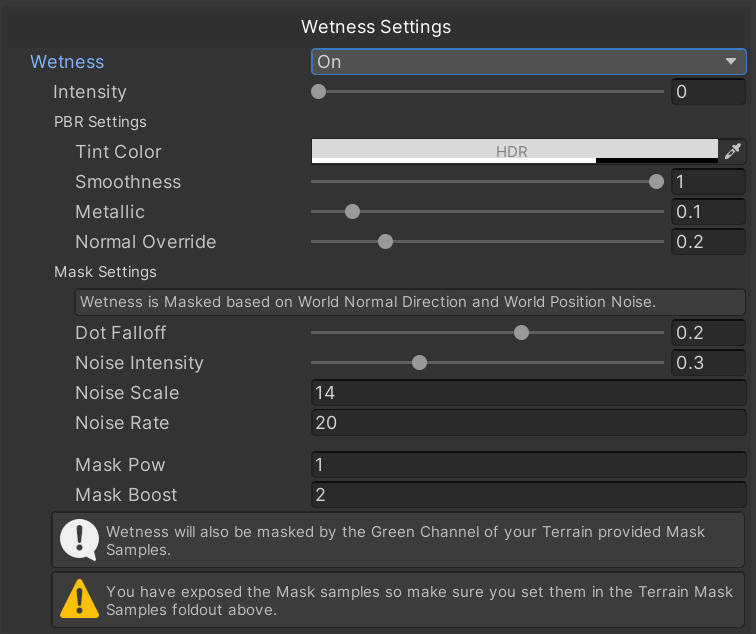
Wetness Settings, when enabled, modifies the Albedo, Normal, Smoothness and Metallic output of the Material to make the Material appear “wet.”
PBR Settings:
- Tint Color: This Color will be multiplied onto the Albedo of the wet area.
- Smoothness: The Smoothness value in the wet area.
- Metallic: The Metalness value in the wet area.
- Normal Override: This lerps the surface Normal toward a smooth result in the wet area. A value of 0 will use the current Normal, a value of 1 will be smooth.
Wetness is masked by the World Normal Direction and World Position Noise.
Mask Settings:
- Dot Falloff: How far of directly vertical World Normals should this Material appear wet.
- Noise Intensity: How much should Noise effect the mask. A low value will modify the edges, a high value will effect everything.
- Noise Scale: The frequency of the Noise calculation (in World Space). A higher number will be more frequent.
- Noise Rate: Noise changes over time when this value is above 0. Use this to get some nice distortion and approximate rain and puddles dripping and sloshing around.
- Mask Pow: The power (exponent) the Mask will be raised to. This reduces the size of the Mask but makes the edge sharper.
- Mask Boost: A multiplier onto the Mask. Increasing the Boost will increase the size of the Mask and make the edge sharper.
Wetness is also masked by any provided Terrain Mask’s Green Channel!
Frost Settings
When enabled, Frost, applies a…. frost… effect on your Material. Remember, you don’t HAVE to use these Frost settings to render “Frost”, that may not suit your product. Fungal overgrowth, blight, slime, crystals, etc. could all be recreated with the available properties and a new data Texture.
Frost Texture
The Frost Texture is a Data Packed texture that includes several textures, packed into the channels of the texture to efficiently provide enough information to create a convincing effect.
- R Channel: Height
- G Channel: Normal Map X
- B Channel: Curvature Map
- A Channel: Normal Map Y
If this sounds complicated, don’t worry, the FRDS Package includes a Frost Texture (named frost_data) you can use for a convincing result.
Use UV1?
This Toggle lets you opt into using the mesh’s Texcoord1 as your base UV’s instead of Texcoord0.
Colors
– Frost Color: The HDR Color to use in the “dark” parts of the Frost effect.
– Highlight Color: The HDR Color to use in the “bright” parts of the Frost effect.
Frost Mask Mode
- Off: Only the Data texture is used for masking.
- Mask
- Height: Masks out the bottom of the Mesh so Frost only appears on the top of the Mesh. This is great for grass, rocks, and even trees, anything where you want a vertical gradient.
- Sphere: Masks out the area around the Pivot of the Mesh so Frost only appears at the edges. This is great for ferns and shrubs.
SubSurface Settings
SubSurface Settings allow you to simulate the effect of light passing through the edges of a semi-transparent material. It is tempting to want to enable SubSurface on everything, and it can enrich your visuals. FRDS uses a very fast approximation that will run well, even on mobile hardware. But try to be selective and only enable this feature on Materials where it will really pay off to save performance.
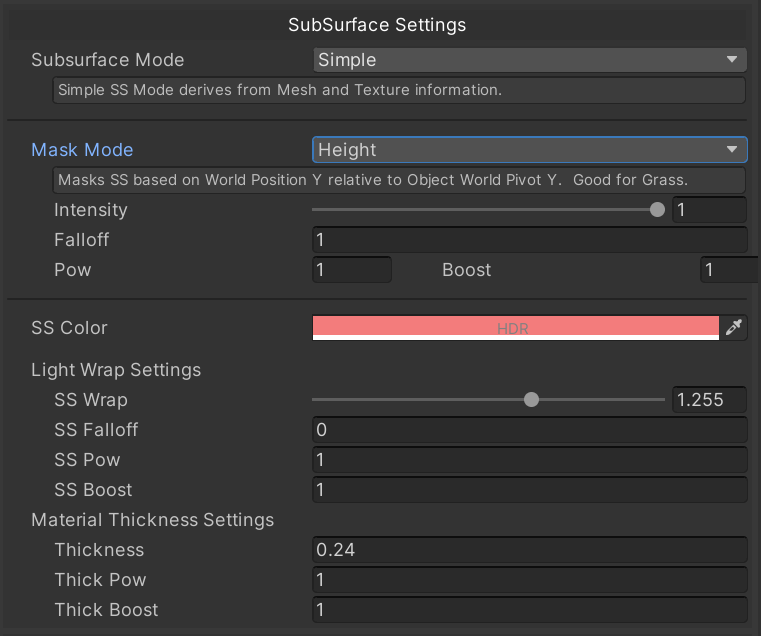
SubSurface Mode
- Off: SubSurfacing won’t be applied at all.
- Simple: SubSurfacing will be output to the Emission of the Material.
- Complex: SubSurfacing will be output to the Emission of the Material after being combined with any shadows.
Mask Mode
- Off: SubSurfacing won’t be Masked at all.
- Height: Masks the SubSurfacing to only the top of the mesh, great for grass, etc.
- Sphere: Masks out the center of a mesh so SubSurfacing is only applied around the edges of the mesh. Great for ferns, shrubs, etc.
Additional Mask Settings
- Intensity: How much does the Mask impact the output. A value of 0 won’t mask at all.
- Falloff: Adds to the Mask to control the overall size.
- Pow: The exponent to raise the Mask to. This will reduce the Mask and sharpen the edge.
- Boost: The multiplier to add to the Mask. This will increase the Mask and sharpen the edge.
Additional Settings
- SS Color: The HDR Color that will be added to the Emission for SubSurface.
Light Wrap Settings
- SS Wrap: This property modifies the size the light falloff across the mesh. The illuminated area is where SubSurfacing can be applied.
- SS Falloff: Adds to the Light Falloff.
- SS Pow: Raises the Light Falloff to the exponent.
- SS Boost: Multiplies with the Light Falloff.
Material Thickness Settings
- Thickness: This property represents the width of the Surface through which the light scatter can occur. A high value will allow more SS.
- Thick Pow: Raises the Thickness to the exponent.
- Thick Boost: Multiplies with the Thickness.
Saturation Settings

Saturation Settings let you modify the Saturation of the Albedo and/or Emission of the Material after all other effects have been calculated. This is great for normalizing lots of assets to the style and visuals you want to achieve. Or create interesting effects without relying on expensive Post Processing.
- Albedo Sat Intensity: How much should the Saturation Property Slider effect the Albedo result. A value of 0 will not use the Saturation value at all.
- Emission Sat Intensity: How much should the Saturation Property Slider effect the Emission result. A value of 0 will not use the Saturation value at all.
- Saturation: How saturated should the Albedo and/or Emission be? A value of 0 will be completely Greyscale. A value of 1 will be exactly the same Saturation as it is prior to this effect being applied. A value greater than 1 will be extra saturated.
Debug Settings
Debug Settings display lets you preview different aspects of the Material in use during the rendering process.

Debug Mode
- Off: Don’t draw any Debug information.
- Vertex Color: Preview the Vertex Color of the Mesh.
- V2F0: BetterShaders register used across effects. R: Local Vertex Y Position (during Vertex calculations), Albedo Mask, G: Transmission, B: Emission Mask, A Alpha
- V2F1: BetterShaders register used across effects. RGBA caches the Terrain Mask Sample. The Terrain Mask is used to mask additional effects. R: Wind Intensity, G: Wetness, B: Frost, A: (not in use yet).
- Emission: Output just the Emission.
Alpha Mode
- Off: Don’t modify the Alpha.
- Exclusive: Albedo Color is set to the Vertex Color Alpha, and the Alpha is set to 1 so the object is fully opaque.
- Alpha: Vertex Color Alpha is used as the output Alpha.
- Add Alpha: The Alpha is added onto the Albedo.
Also in the Debug Settings you can find a list of the active Keywords on this Material.
Example Scenes
Foliage Renderer Deluxe Shader comes with a few example Scenes to help you see the Shader in action.
FRDeluxeExampleScene
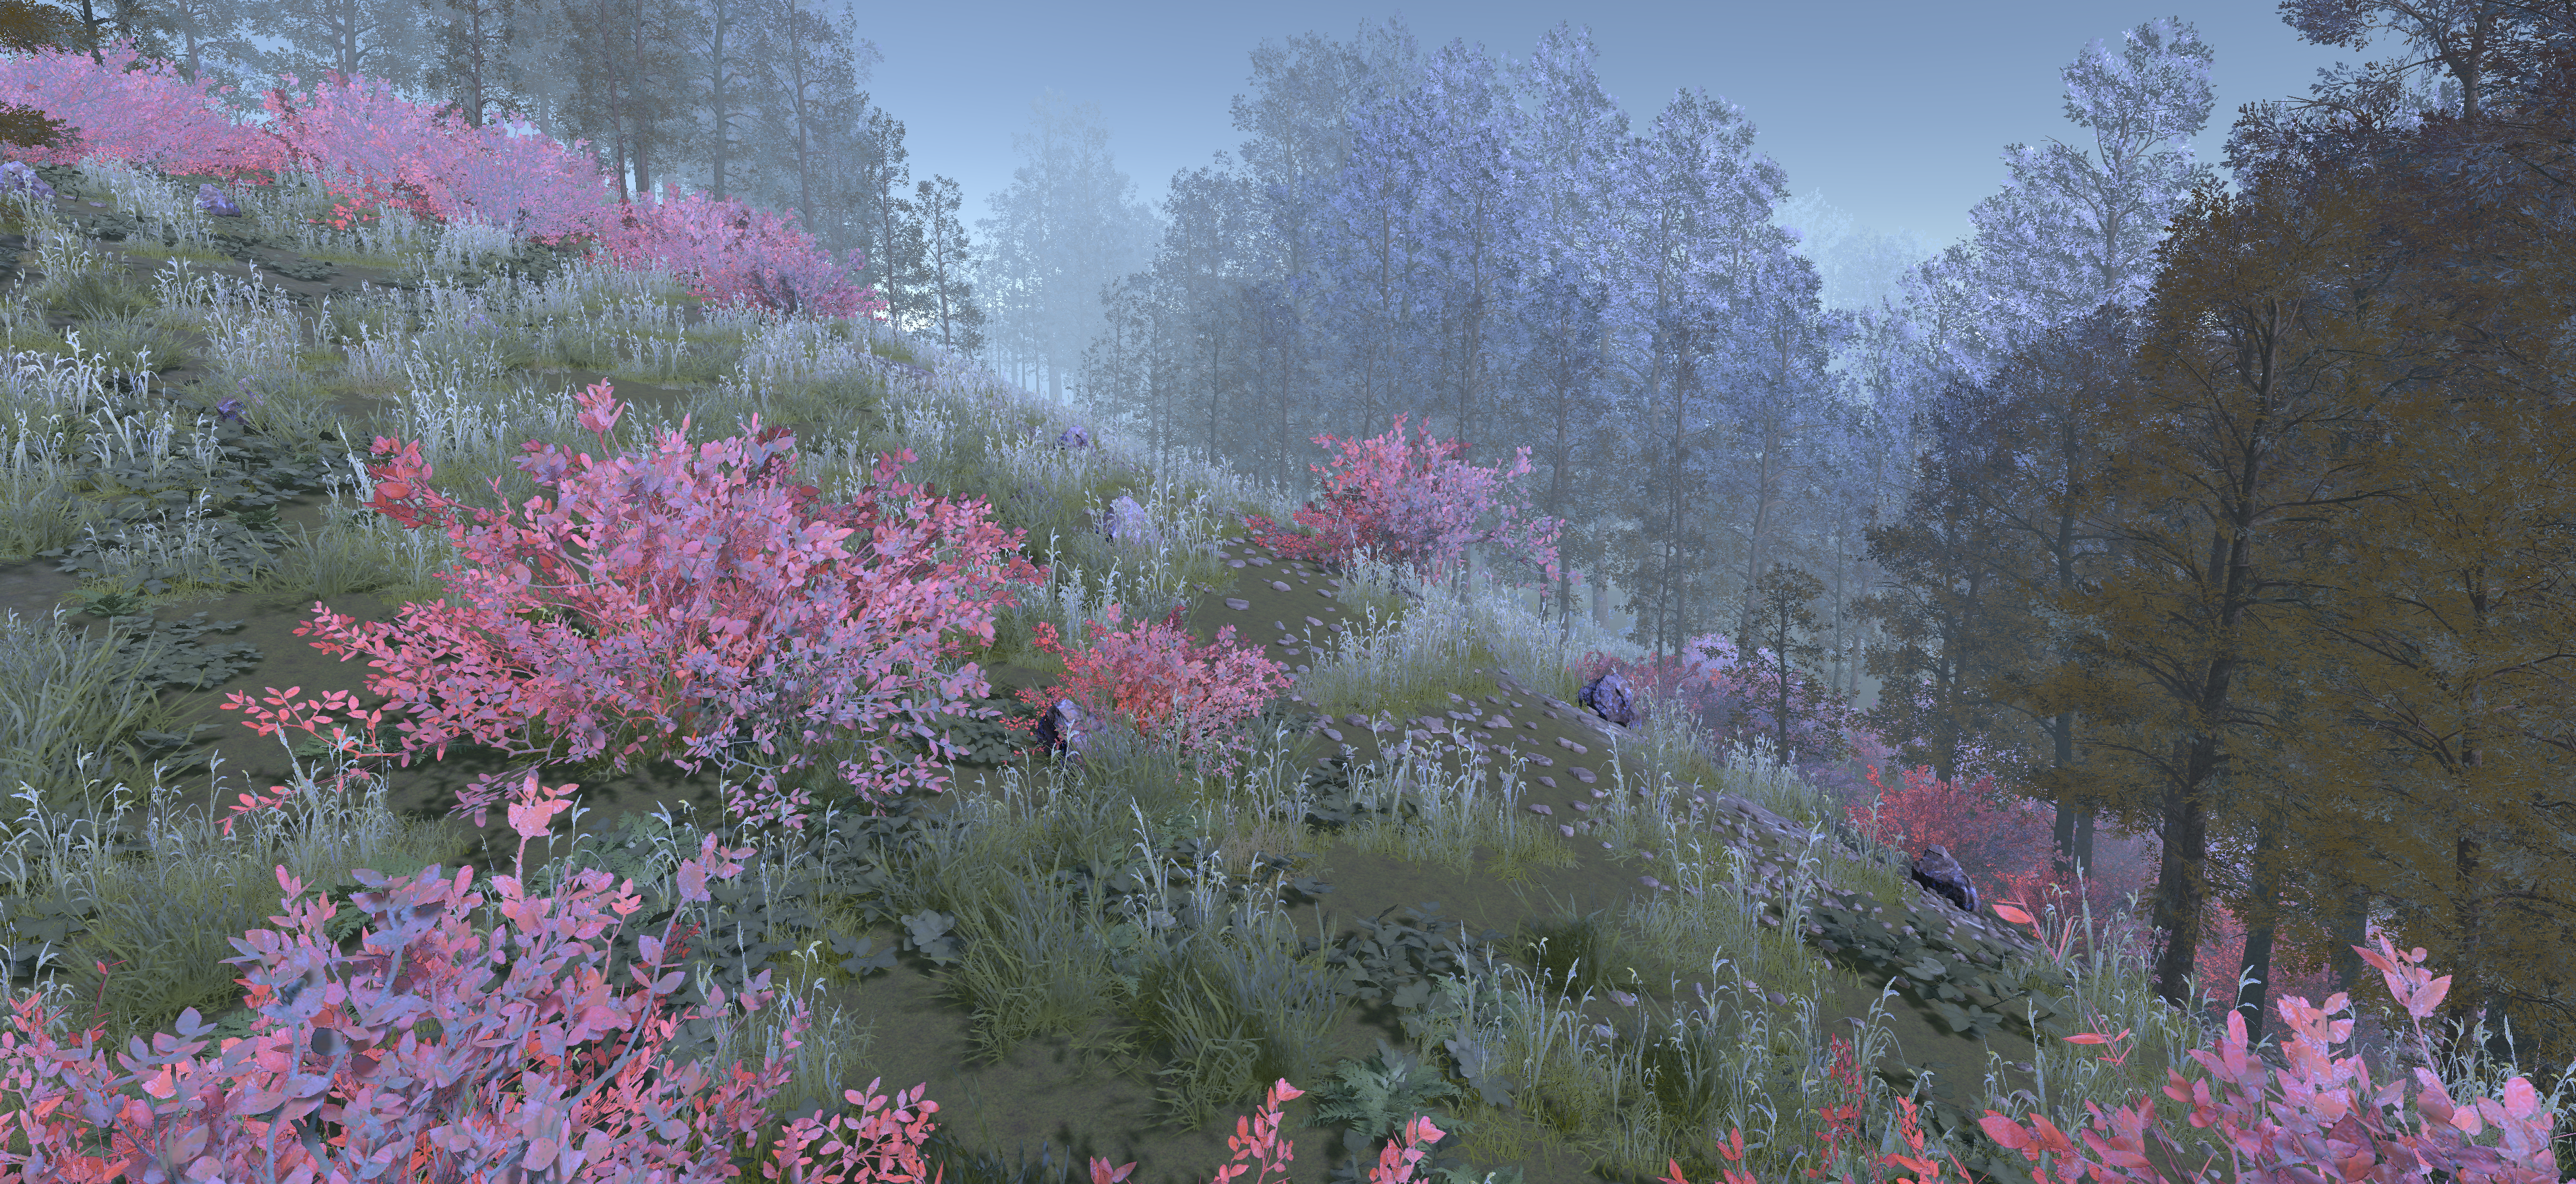
This Scene includes the Terrain and Unity Terrain URP Assets you see in the Trailer and Media for FRDS.
You will find a CameraAnchor object that has a Camera Child Object, and a number of child Sphere Objects. This CameraAnchor is rotated slowly by the SpinOverTime component, which is also responsible for aligning the Camera and Spheres to the Terrain. Each Sphere has a Foliage Interactable component with an assigned radius.
The Interactable Controller object has the Foliage Interactable Manager component. This singleton manages the updating and setting of the Global interactable array. You can read more about the Interactable system below.
If you experience performance issues previewing this scene, find the Reflection Probe (it is parented to the Main Camera) and change its type, or Refresh Mode so it isn’t rendering all the time. While this looks very nice for the reflections on the metallic Sphere objects it can be very expensive.
FRDeluxe_SettingExamples
This Scene has some lined up examples of different Prefabs showing off a few of the options available to you with FRDS. It can be useful for quickly trying out some of the Material Settings.
Additional Packages
Included you will find two more Unity Packages you can unpack for more useful assets and examples. But, these have some additional dependencies.
FRDeluxe_FRExampleScene
This package includes a version of the Example Scene that fully utilizes Foliage Renderer. If you have Foliage Renderer, you can unpack this and see the FRDS shader in use alongside the rendering speedup of Foliage Renderer.
FRDeluxe_MatManagerAssets
This package includes the Material Manager Texture Packer Configs for converting the Unity Terrain Assets from their standard texture format to the packed formats at use in the Examples included with FRDS (UltraLite, StandardPacked, etc). If you have the Material Manager Package you can unpack this package to make use of those Assets, and the Material Manager is completely free! So you probably should get it anyway!