
08 Oct Foliage Renderer – Wind Reactor
The Foliage Renderer Wind Reactor delivers exciting new tools and components for bringing your foliage and Scenes to life!
For the latest version of this, and other Foliage Renderer Documentation, please visit: https://dicewrenchdesigns.com/category/assets/
Getting Started
Be sure to check out this Walkthrough Video if you are just getting started with Foliage Renderer Wind Reactor.
Limitations and Requirements
The Foliage Renderer Wind Reactor makes use of Compute Shaders, Burst compiler and Jobs. Ensure your target platform supports these features.
The Foliage Renderer Wind Reactor also requires Foliage Renderer 2.
Technical Support
Technical Support is handled via the Dicewrench Designs’ discord group. Please read the documentation before seeking support, as many questions are already answered within.
You can find additional helpful videos and walkthroughs on the Dicewrench Designs Youtube.
High Level Concepts
Foliage Renderer Wind Reactor (FRWR) contains components and tools that do several useful things and work in conjunction to add polish and feedback to your environments. Broadly we can categorize these into three groups.
- Wind Control
- FRWR utilizes a WindController component, familiar to existing FR or FRDS users, to set Global Shader Properties describing the wind in the Scene.
- Wind Sampling and Reacting
- Wind Sampler components evaluate the current wind direction and intensity at their position, and relay that to Wind Reactors.
- Wind Reactors translate direction and intensity information from the Wind Sampler they are registered (or parented) to and convert that into specific behavior based on their type.
- Terrain Decorating
- Terrain Decorator components sit on Terrain and instantiate Prototype Decorator Objects at the position of Terrain Detail and Tree Instances.
- Prototype Decorator components reside on GameObjects you want to instantiate and connect to specific Detail or Tree Instances.
- Terrain Decorator Blueprints are ScriptableObjects that define which Decorators should be placed at which Detail or Tree Instances.
- Foliage Carpet Creation
- Generate combined and atlased Meshes quickly.
- Reduce instance counts, speeding up both rendering and Terrain Data reading.
- Reduce draw calls by merging multiple prefabs that use the same Shader.
Wind Reactor Setup
Setting up the Foliage Renderer Wind Reactor for your scene is easy – after installing the package there are a few simple steps to follow.
- If your Scene does not already have an FR Wind Controller or FRDS Wind Controller, add a Wind Controller via the Create Asset Menu / Foliage Renderer / Wind Controller
- The Wind Controller will set the Global Shader Properties to modify the Materials in your Scene and provide data for Wind Samplers.
- Populate your Scene with Wind Samplers
- You can create new Samplers via the Create Asset Menu / FoliageRenderer / Wind Sampler
- Or by adding them to existing Objects with Add Component / Foliage Renderer / Wind Sampler
- Populate your Scene with Wind Reactors
- Add Wind Reactor Components as needed along with the corresponding Components those Reactors control.
- Assign your Reactors to Samplers or simply Parent the Reactors to the Samplers and they will be attached at runtime.
For simple Scenes and use cases, these steps will be sufficient to get you started. But if you need to Decorate an existing Terrain we will utilize some additional tooling to setup Wind Reactors. Next, we will look at the Wind Reactor Components. If you are ready to start applying these Components, skip ahead to the Terrain Decorating section.
Wind Reactor Controller
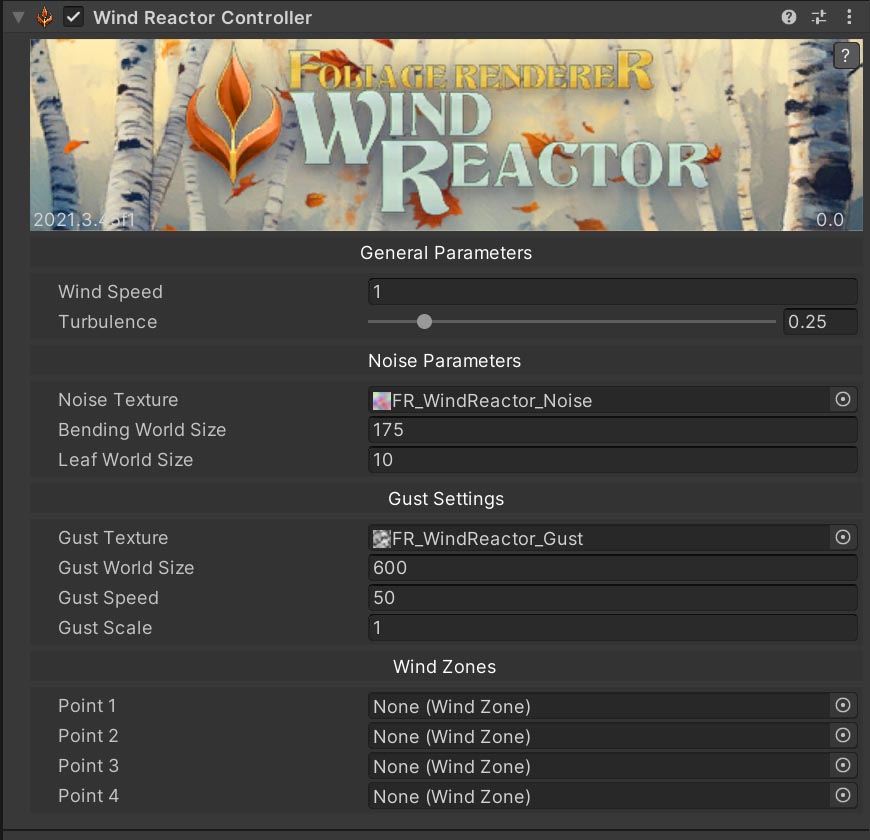
The core of the Wind systems in FR is still the Wind Controller GameObject. For completeness another iteration is included here called the WindReactorController, but it works the same and sets the same Shader Properties as the other Wind Controllers in the FR system. You can use any one of them (FR, FRDS, FRWR) but don’t need more than one.
Wind Reactor Components
Wind Reactors are Components that take the data from their assigned Wind Sampler and convert that into some effect depending on what type of Reactor they are.
All Wind Reactors inherit WindReactorBase, an abstract base class you can also inherit if you want to extend the system with custom functionality for your Project.
- Animator Wind Reactor
- Shifts any Animator Parameters (bool, trigger, float, int) based on the current Wind Intensity over time.
- Audio Source Wind Reactor
- Shifts the Volume and Pitch of an Audio Source based on the current Wind Intensity over time.
- Material Wind Reactor
- Shifts Material Parameters (float, int, vector, or color) by the current Wind Intensity over time.
- Particle System Wind Reactor
- Plays or Stops a Particle System based on the current Wind Intensity.
- Transform Wind Reactor
- Transform Wind Reactors apply changes to an array of Transform targets. Axis changes can be applied to can be locked.
- Position Wind Reactor
- Translates the targets in the Wind Direction by the current Wind Intensity over time.
- Rotation Wind Reactor
- Rotates the targets toward the Wind Direction by the current Wind Intensity over time.
- Scale Wind Reactor
- Scales the targets based on current Wind Intensity over time.
- Transform Wind Reactors apply changes to an array of Transform targets. Axis changes can be applied to can be locked.
Wind Samplers, Manager, and Toolkit
So far, things are pretty straight forward, but you may be asking:
“Why are Wind Samplers and Wind Reactors not the same thing? Don’t I want every Tree to independently sample wind for the highest possible fidelity?”
- You, a very smart developer, just now
In a perfect world, absolutely yes! However, Wind Sampling requires a Compute Shader readback, which is costly for performance. So, we want to be as sparing as makes sense for our use case, target platform and hardware.
You may only be building for High End PC users, in which case you can simply put a WindSampler on each WindReactor you intend to make use of, and you are set. But for lower end hardware it is important to minimize Sampler overhead where possible, so these Components are decoupled. This lets you decide what amount of coverage is right for your project!
With that in mind let’s dig deeper into Wind Sampling…
Wind Sampler
Wind Samplers sample the Wind Noise texture managed by the Wind Controller run by the Wind Reactor Manager.
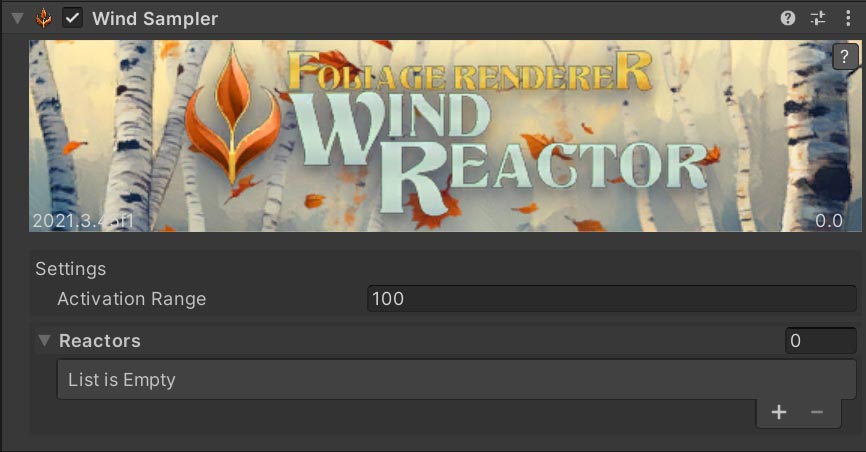
Samplers themselves are quite simple, with only a couple properties to configure:
- Activation Range: How far, in World Units, from any Interest Transforms should this Sampler read and update?
- Reactors: Reactors registered to this Sampler. Child Reactors that aren’t registered will register automatically.
Now, we need to learn about Interest Transforms which are controlled by the Wind Reactor Manager.
Wind Reactor Manager
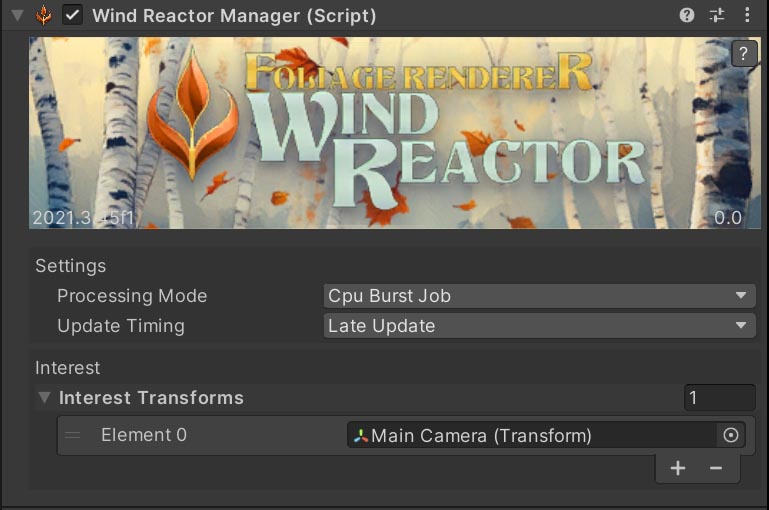
The Wind Reactor Manager is a singleton which will be lazily generated as necessary. It is responsible for controlling at what point during the frame Wind is Sampled by the Samplers and how. There are two Processing Modes to choose from that offer performance trade offs, more on those below, but by default the system uses a CPU Burst Job Mode. Timing is controlled by the Update Timing property which will be familiar from other FR components.
Second, the Manager has a list of ‘Interest Transforms’ these are Transforms whose position is watched to determine what Samplers should be processed. The Main Camera’s Transform is always added as an Interest Transform, and is likely the only one you need. When a Wind Sampler has an Interest Transform in its’ Activation Range, that Sampler WILL be sampled and its new Wind Intensity reading passed to all of its registered Reactors.
You likely do not need to add a Wind Reactor Manager and can let one be automatically created at runtime as needed. Only if you have multiple Cameras that need to view the fully rendered environment, including the Wind Reactors accurate state, should you add and manage a Wind Reactor Manager at edit time.
This decoupling is designed to let you share sampling responsibility across components that belong to one or more GameObjects. This is an important performance consideration. And you will find you don’t need every single object to have its own wind sampling to get a sense of wind sweeping across your environment.
And to that end, you may already be dreading trying to set up Samplers across your huge terrains and connect all of the Wind Reactors in your scene! But don’t worry! I thought of that too, the Wind Reactor Toolkit will help you do this effortlessly.
Wind Reactor Manager Processing Modes
There are two Wind Reactor Manager Processing Modes you can choose from and each one offers different advantages, so let’s take a closer look.
- CPU Burst Job
- This is the default mode, and will be used by any dynamically created Wind Reactor Managers.
- It runs fully on the CPU using a Burst translation of the Shader Wind code from the rest of FR.
- This is perfect for a modest number of Wind Samplers and should be fine for most use cases.
- It does require your Wind Controller Textures be set Read/Write Enabled. Don’t worry, it will warn you about this and the Editor will expose Buttons to help you quickly fix your textures’ importers for you.
- I recommend you start with this Mode, and only switch to the GPU Compute Mode if you have an extreme use case to resolve.
- GPU Compute
- This mode offers you the potential of absolutely ludicrous speed for a vast number of Wind Samplers…
- BUT, the readback of the results from the GPU can be prohibitively costly!
- However, it will scale very very slowly, basically once you bite the bullet to support it extra samplers have very minimal impact.
- This mode does not require your Wind Controller Textures to be set Read/Write Enabled.
- If you need extremely high fidelity Wind Sampling (like every grass gets its own Sampler) this is for you.
- Or if you just have tons of GPU to burn and won’t freak out about Semaphore.WaitForSignals in your Profiler it may also be a good fit for your project.
Working with the Wind Reactor Toolkit
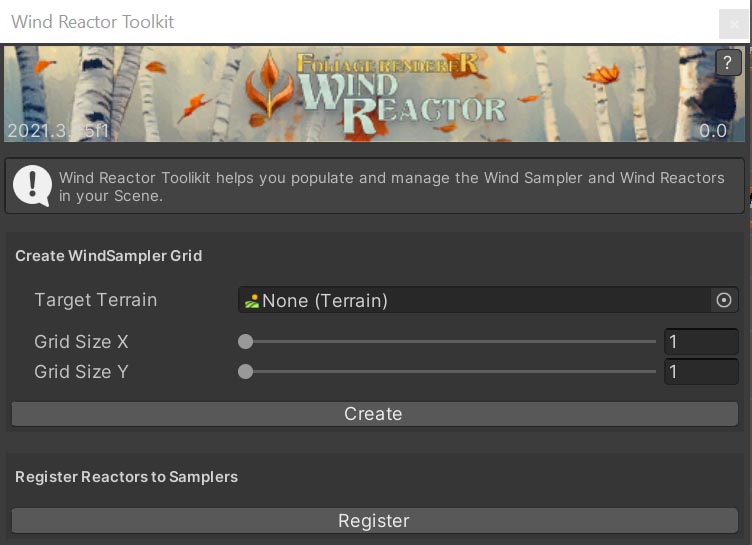
The Wind Reactor Toolkit makes it easy to quickly generate a grid of Wind Samplers, and connect all the Wind Reactors in your scene to the nearest Sampler!
- Open the Wind Reactor Toolkit by navigating to Window > Foliage Renderer > Wind Reactor Toolkit and selecting it.
- Assign your Target Terrain with a Terrain in your current Scene.
- Set the Grid Size Sliders at a reasonable number. You may have to do some experimenting to determine what grid resolution is best for your content and performance considerations. 8×8 is a great place to start if you have no idea.
- Hit the ‘Create’ Button! This will create new GameObjects and assign Wind Samplers to them with automatically set Activation Ranges so they overlap and fully envelope your Terrain.
- If you have Wind Reactors ready in your Scene to Register, you can hit the ‘Register’ Button to automatically register the Wind Reactors with the nearest Wind Sampler they are in the Activation Range of.
Your entire Scene will now be ready to Sample and React to Wind!
If you didn’t have Wind Reactors ready in Step 5, you can quickly populate your Scene using the Terrain Decoration tools detailed in the next section!
Wind Reactor APIs
These are the public functions in the Wind Reaction ecosystem you may want to be aware of.
WindReactorManager
- Register(WindSampler sampler)
- Registers a WindSampler so it can be updated by the system. WindSamplers do this automatically, you will only need this if you’re programmatically creating these at runtime.
- Unregister(WindSampler sampler)
- Unregisters a WindSampler. WindSamplers do this automatically, you will only need this if you’re programmatically creating these at runtime.
WindSampler
- RegisterReactor(WindReactorBase reactor)
- Registers a WindReactor to receive this Sampler’s calculated Wind values.
- UnregisterReactor(WindReactorBase reactor)
- Unregisters a WindReactor.
- ApplyWind(float4 intensity)
- Apply the direction and intensity of the Wind to this Sampler. Called by the WindReactorManager
WindReactorBase
- virtual Activate(float intensity)
- Sets the WindReactorBase active if it is not already. Will be overridden by child classes.
- virtual Deactivate(float intensity)
- Sets the WindReactorBase inactive if it is not already. Will be overridden by child classes.
- virtual ApplyWind(float4 intensity)
- Apply the direction and intensity of the Wind to this Reactor. Called by the WindSampler. Will be overridden by child classes.
Terrain Decorating
Much of the Foliage Renderer ecosystem revolves around Terrains and rendering Tree and Detail Instances. So you most likely are hoping to use Wind Reactor in conjunction with your Unity Terrain objects.
In that case, Unity presents us with a workflow problem! Details and Trees aren’t actual GameObjects instantiated in the Scene! So we can’t just add our Wind Reactors, Particle Systems, Samplers, and so on to our Prototype Prefabs and get the results we want.
In this situation we can add a Terrain Decorator component to our Terrain and utilize it to add GameObjects at the positions of our Detail and Tree Instances.
- Add the Terrain Decorator to our Terrain
- Ensure your Terrain has a valid TerrainData assigned (this is almost always the case, but
- Use the Add Component Menu / FoliageRenderer / Terrain Decorator
- Create Terrain Decorator Blueprints for our Detail and Tree Instances
- In the Project View, use the Create Asset Menu / FoliageRenderer / Terrain Decorator Blueprint
- Populate the Tree Decorator and Detail Decorator Arrays as desired (see below for more info on Terrain Decorator Blueprints)
- Assign the desired Terrain Decorator Blueprints to the Decorators Array on your Terrain Decorator.
- These Blueprints will be processed based on the Seed and Mode setting you have assigned.
- Decide if you want this Decorator to run at Runtime or at Edit Time.
- If Runtime, check Apply On Start.
- When you are ready, Run your game and Decorators will be populated when the Terrain Object’s Start function is called.
- If Edit Time, uncheck Apply on Start.
- You can create the Decorators at any time during Editing by clicking the ‘Apply Decorators’ button on the Terrain Decorator Inspector.
- If Runtime, check Apply On Start.
Terrain Decorator
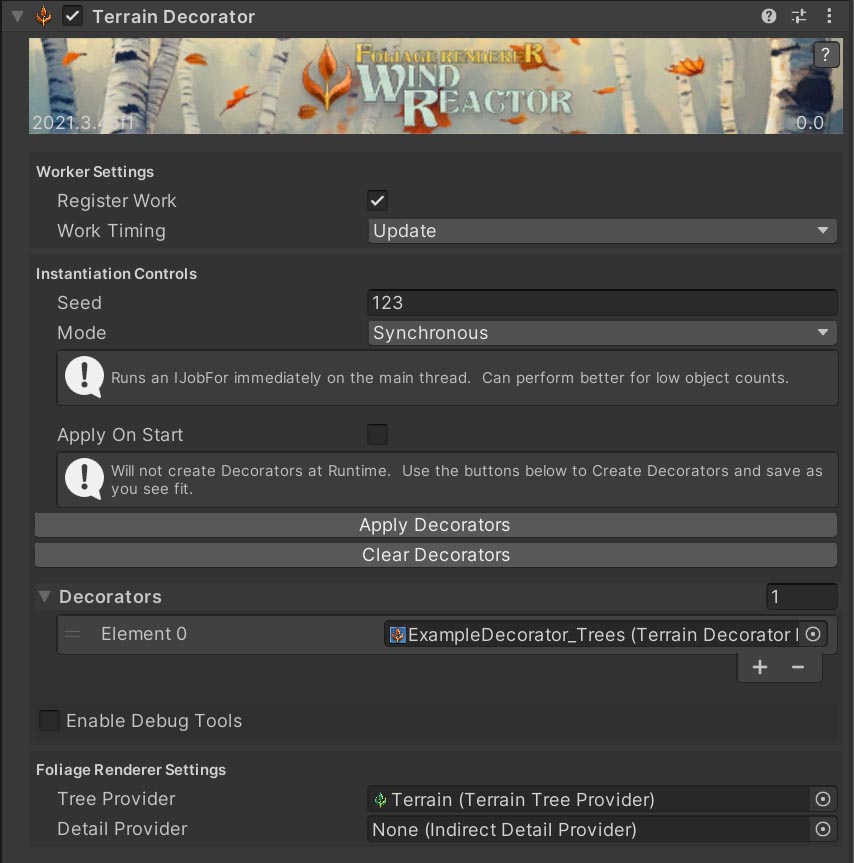
The Terrain Decorator component is responsible for applying the Terrain Decorator Blueprints assigned to it to the Terrain component on the same GameObject.
There are a handful of settings to configure:
- Worker Settings: Like the Providers in FR, the Terrain Decorator uses the IWorker interface to amortize the per frame work done by the FR system. These settings are important if you intend to use this component to decorate Instances at runtime. If you’re only running it at Edit time, you can gloss over this section.
- Register Work: Should this component register as a Worker or just run when called?
- Work Timing: When in the frame should this component’s work be executed?
- Instantiation Controls
- Seed: What seed to use when running Decorator Blueprints. This makes the output repeatable if you want to preview at Edit time what you will actually get at runtime if you aren’t saving the output.
- Mode: Should the Burst Jobs executing these operations be Synchronous or Scheduled.
- Apply on Start: Should this execute when Start() occurs?
- Buttons
- Apply Decorators: Runs all the Decorator Blueprints with the specified Seed.
- Clear Decorators: Remove any spawned Decorators.
- Decorators: An array of Terrain Decorator Blueprint ScriptableObjects this Terrain Decorator will use to apply decorations.
- Enable Debug Tools: Turns on the ability to see some Debug Gizmos, more on their application in the next section on Skip Instances.
- Foliage Renderer Settings: We store a reference to the associated Tree and Detail Providers for this Terrain so we can route Skip Instance calls accordingly. More on Skip Instances in their own section.
- Tree Provider
- Detail Provider
Terrain Decorator Blueprints
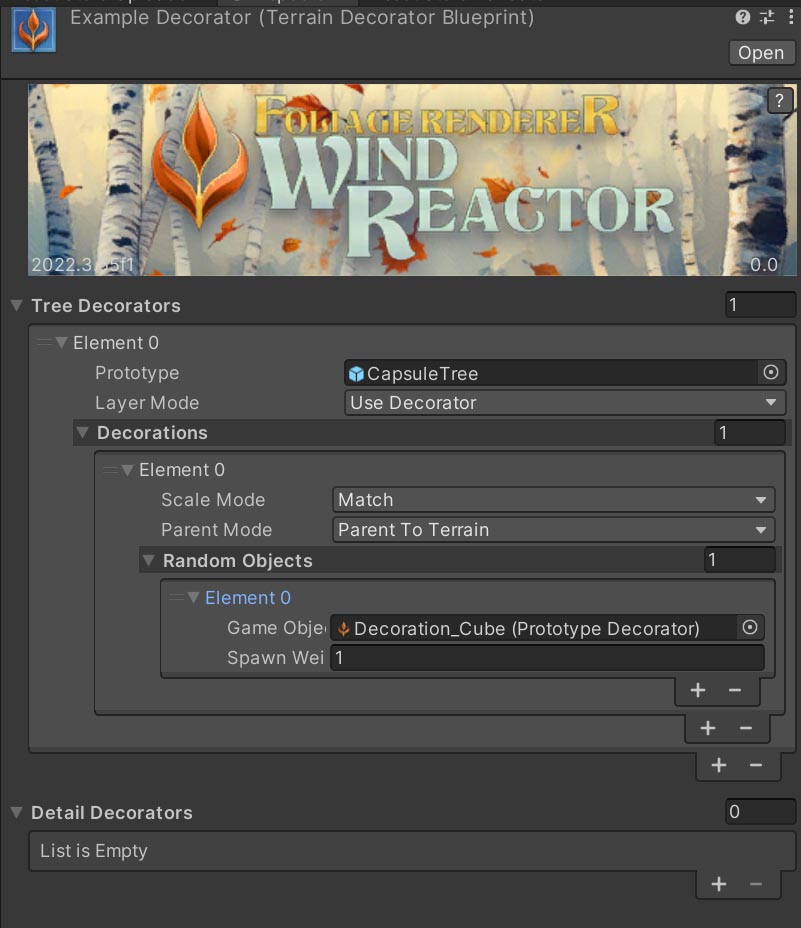
Terrain Decorator Blueprints are ScriptableObjects that let you define what Decorations should be placed on a given Tree or Detail Prototype.
For each element in the Decorator Arrays you will want to set the following properties:
- Prototype
- Which Prototype in the Tree or Detail Instances of your Terrain should this effect
- Layer Mode
- How should the new Prototype Decorator GameObject’s Layer be set
- Decorations
- This is an array of “Decoration Groups”. You may want to spawn multiple Objects and each of these can be chosen from a random set of Objects.
- For Each Decorations Element you will have the following properties:
- Scale Mode
- How should the new Object be scaled
- Parent Mode
- How should the new Object be Parented; Parent to the Terrain, Parent to a Parent Object (as set by the Terrain Decorator), or Don’t Parent (will be placed in the root of the Active Scene)
- Random Objects Array
- This Array contains an array of elements with:
- A reference to the Prototype Decorator Object to Spawn
- A weight float for how likely this Prototype is to be selected. All object weights will be added, a random value will be generated based on the Terrain Decorator’s Seed and then an Object will be selected based on that result.
- This Array contains an array of elements with:
- Scale Mode
Here you can see some unremarkable White Cubes placed on every Red Bush Detail in this testing scene!
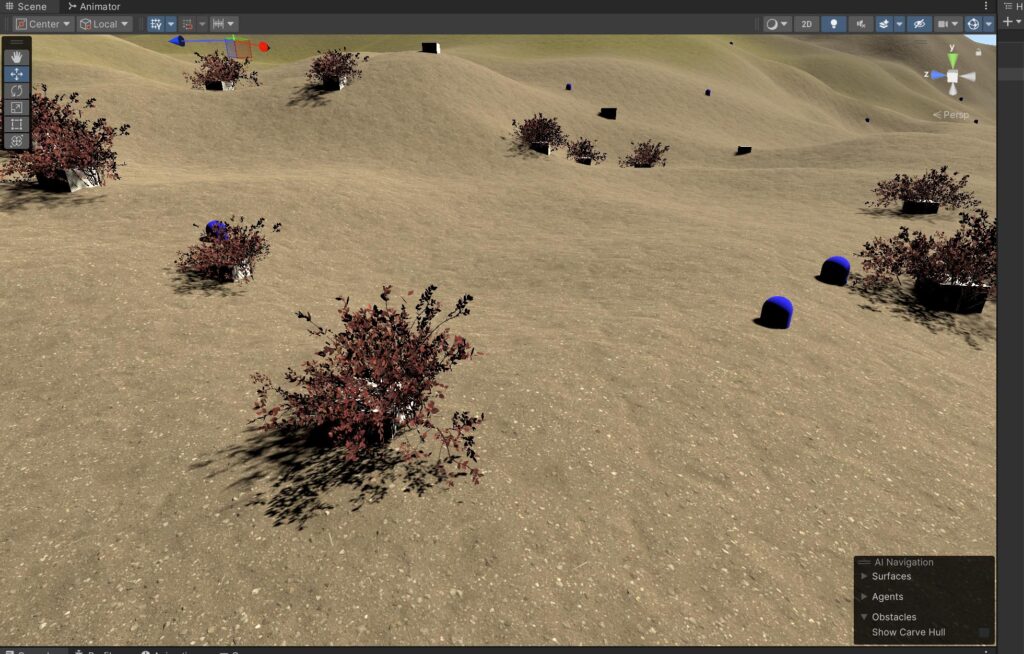
But this example should give you all sorts of ideas! You can attach Wind Reactor Particle Systems, Lights, etc. Any prefab you think of can now be quickly and repeatably instantiated at the position, scale, and rotation of the Trees and Details in your Terrain.
Prototype Decorator
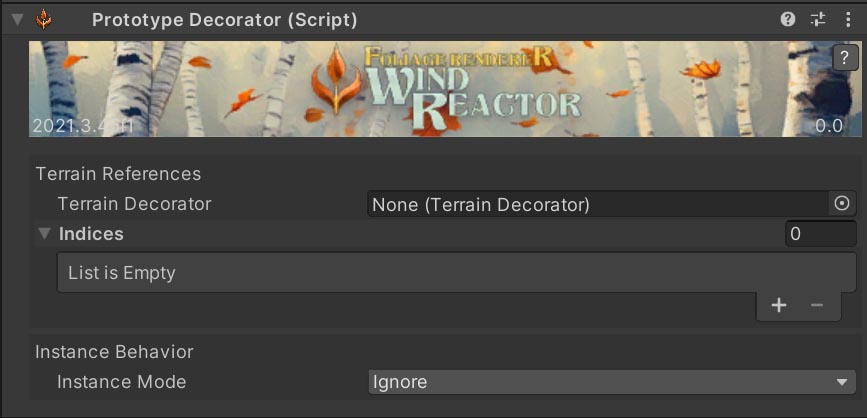
Prototype Decorator is a simple Component you need on the GameObjects you wish to spawn with the Terrain Decorator and have assigned in Terrain Decorator Blueprints. It has a few properties, most of which are automatically assigned by the system.
- Terrain Decorator: The Terrain Decorator which spawned this Decorator, for routing of show/hide events related to Skip Instances. This will be automatically set if you create this with the Terrain Decorator.
- Indices: An array of Prototype Indices (i.e. the exact Tree in the Terrain Data) that this Decorator corresponds to. This will be automatically set if you create this with the Terrain Decorator.
- Instance Behavior
- Instance Mode: This is an enum defining how the Decorator should respond to any Skip Instance changes regarding this Decorator’s Indices.
- Ignore: Just ignore any events. Use this if you need to manage more complex state.
- Destroy: If these Indices are all removed, Destroys this GameObject. Perfect if you want a destructible environment.
- Disable: If these Indices are all removed, Deactivates this GameObject. Reactivates when an Indices returns. Perfect if you want to harvest and re-grow Trees in the same spot.
- Instance Mode: This is an enum defining how the Decorator should respond to any Skip Instance changes regarding this Decorator’s Indices.
Skip Instances
Skip Instances are a powerful optimization workflow built right into FR but now surfaced in the Wind Reactor Module in a more approachable way.
In short, Skip Instances are an array of indices that a Provider should NOT DRAW, aka “skip”.
These Skip Instances are pulled out of the processing queue early in the FR process, removing them from rendering altogether.
Why Skip?
If you’re building a Survival Game you have probably tried setting up Tree Harvesting where a Player can cut down the Trees on the Terrain. And you’ve probably noticed updating the Terrain Data when you remove a Tree is a very heavy operation that is prone to introducing frame chug. Further complicating things is now FR will want to Refresh because your Terrain changed.
By modifying our Skip Instances array we can effectively hide a Tree for free, by simply not drawing it with FR. If we disable colliders on our Trees in the Terrain, and populate those colliders in our Scene with Prototype Decorators… Now we have the best of both worlds!
Prototype Decorators store an array of Indices that they belong to for this very reason. So they can be hidden or shown automatically in relation to those Indices being added or removed from the Skip Instances arrays!
Skip Debugging
Unity, however, presents quite a complication for us. Terrain Data, and prototype Indices ARE NOT STABLE. Any dirtying and saving of Terrain Data can re-order prototype Indices. This means if you decorate your Terrain with Prototype Decorators, and then change your Terrain, the indices on the Decorators will no longer match the Indices of the Trees and Details at their position!
In order to help you check Indices, Terrain Decorator’s Debug Tools lets you specify a Tree Index. And, Prototype Decorators have an array of indices that they are associated with. So we can check if our Indices are stable quickly by following these steps:
- Apply Decorators to your Scene.
- Select a Prototype Decorator associated with a Tree. Note its index.
- Navigate to your Terrain Decorator and select it.
- Toggle ‘Enable Debug Tools’ ON
- Put the Decorator Index from step 2 in the ‘Target Index’ field.
- Ensure Gizmos are enabled in your Scene View.
- Navigate back to your Prototype Decorator. If you see a Yellow and Red Gizmo Sphere overlapping at your Decorator’s position, the Indices are aligned! If they are not, your Indices are whack and you need to Clear and Reapply your Decorators!
With this in mind. Consider the fragility of Skips and if and how you should utilize them in your Project. Read more about this below!
SKIPS ARE FRAGILE
“One does not simply skip into Mordor…”
- Boromir, veteran indie dev
Let me remind you… Terrain Data, and prototype Indices ARE NOT STABLE. Any dirtying and saving of Terrain Data can re-order prototype Indices. This means if you decorate your Terrain with Prototype Decorators, and then change your Terrain, the indices on the Decorators will no longer match the Indices of the Trees and Details at their position! (Wait, didn’t he already write these exact words in this doc?… listen, I know you guys don’t read… I’m just improving my odds this sticks).
Honestly, I would make this whole section red if I could…
For some projects this will be fine. Decorating is easy and repeatable. You can set up your Terrains, apply Decorators after any edits or as part of a build process, and you will be good to go. But, working with additional Terrain tools that incur frequent rebuilds (like mine and everyone’s favorite Microverse) will make rapid iteration challenging.
So what should I do?
I have given you a pathway to extremely performant Tree and Detail modifications inside an ecosystem of highly performant rendering and tooling to make that easy to apply and repeat.
I have NOT solved Unity’s terrible non-deterministic serialization bs.
SKIP INSTANCES are INCREDIBLY POWERFUL!
BUT, make a plan, test your workflow, be patient!
If you are making a Survival game, there are many ways to use the Terrain tools in FR and other great assets to solve your problem. Some work better in conjunction than others. What is the right solution depends on your team and your project.
Terrain Decoration APIs
These are the public functions in the Terrain Decoration ecosystem you may want to be aware of.
TerrainDecorator
- TryWork()
- The IWorker implementation which Clears existing Decorators, and then Applys assigned Decorators
- ClearDecorators()
- Clears the Decorators….
- RemoveInstancesForPrototypeDecorator (PrototypeDecorator prototypeDecorator, bool forceRefresh = false)
- Removes the target PrototypeDecorator from rendering via the corresponding IndirectProviderBase Skip Instances Array.
- RestoreInstancesForPrototypeDecorator (PrototypeDecorator prototypeDecorator, bool forceRefresh = false)
- Restores the target PrototypeDecorator to rendering via the corresponding IndirectProviderBase Skip Instances Array.
- RemoveTreeInstances (PrototypeDecorator prototypeDecorator, bool forceRefresh = false)
- RestoreTreeInstances (PrototypeDecorator prototypeDecorator, bool forceRefresh = false)
- RemoveDetailInstances (PrototypeDecorator prototypeDecorator, bool forceRefresh = false)
- RestoreDetailInstances (PrototypeDecorator prototypeDecorator, bool forceRefresh = false)
- public PrototypeDecorator GetTreeInstanceByIndex(int index)
- public PrototypeDecorator GetDetailInstanceByIndex(int index)
PrototypeDecorator
- RemoveAssociatedInstances (bool forceRefresh = false)
- Via the assigned TerrainDecorator, remove the instances associated with this PrototypeDecorator from rendering via Skip Instances.
- RestoreAssociatedInstances (bool forceRefresh = false)
- Via the assigned TerrainDecorator, restore the instances associated with this PrototypeDecorator to rendering via Skip Instances.
- public bool HasIndex (int value)
- Is the passed value in the array of indices?
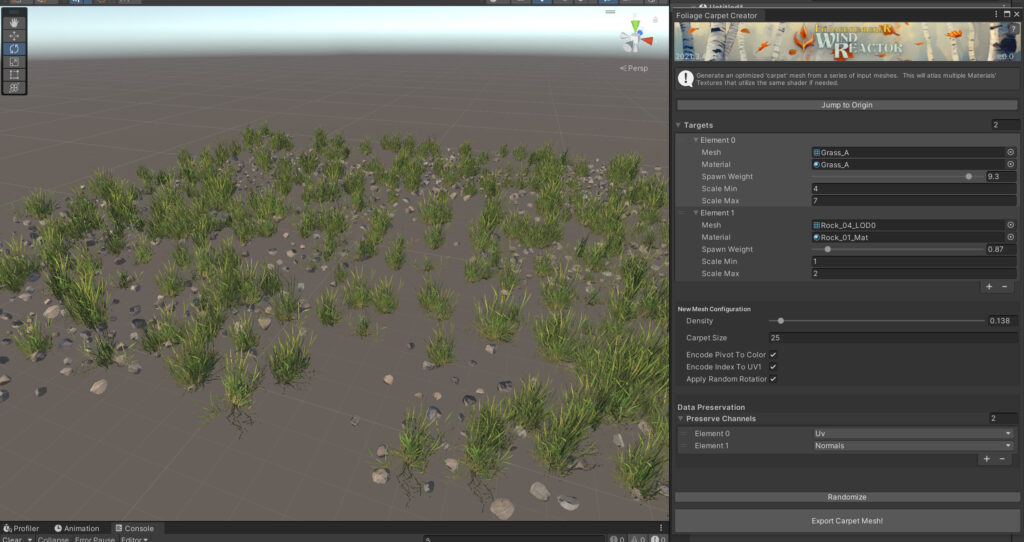
Foliage Carpet Creator
The Foliage Carpet Creator is a new Editor Window that will let you create “carpets”… baked meshes that combine detail objects that share the same Shader into a single Mesh and Material. It will automatically atlas any textures in use and update the UVs of your meshes accordingly as it bakes.
Why Create “Carpets”?
The slowest part of rendering Trees and Details on Terrain is reading the massive arrays of position and rotation information.
Every grass clump needs to know where on the Terrain it sits and how it is facing so it can be rendered. FR makes it fast to render lots of grass clumps, and if you want a lush looking environment you might have millions of clumps! While drawing them might be fast, the initial lift to get the data ready can be quite slow. Carpets give you a great way to have your cake and eat it too!
You can generate a mesh that gives you a lush area of dense grass, but only need to read back position and rotation data from the Terrain for a small fraction of your previous instance counts!
Even better, you can merge many details into a single Carpet eliminating even more Terrain Data!
But won’t these “Carpets” stick through the Terrain?
Both FR and FR Deluxe Shader offer Shader features that will align your mesh to the Heightmap of the Terrain it is being drawn by!
You may remember this feature from the FR documentation…
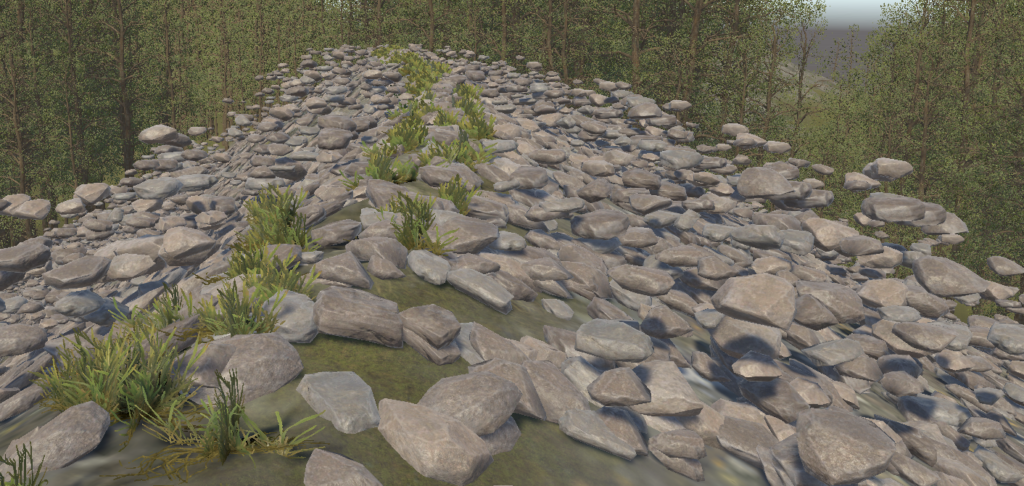 | 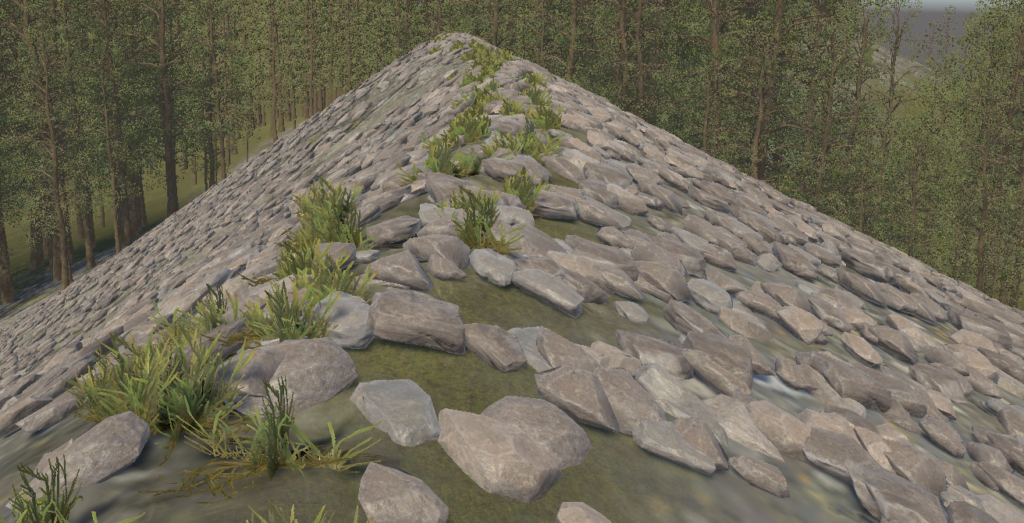 |
| An unaligned Rock “Carpet” from FR | The same Rock “Carpet” aligned to Terrain Height with the FR Lit Shader |
Working with the Carpet Creator
The Carpet Creator has a handful of controls and buttons you will need to interact with to utilize it and generate new meshes.
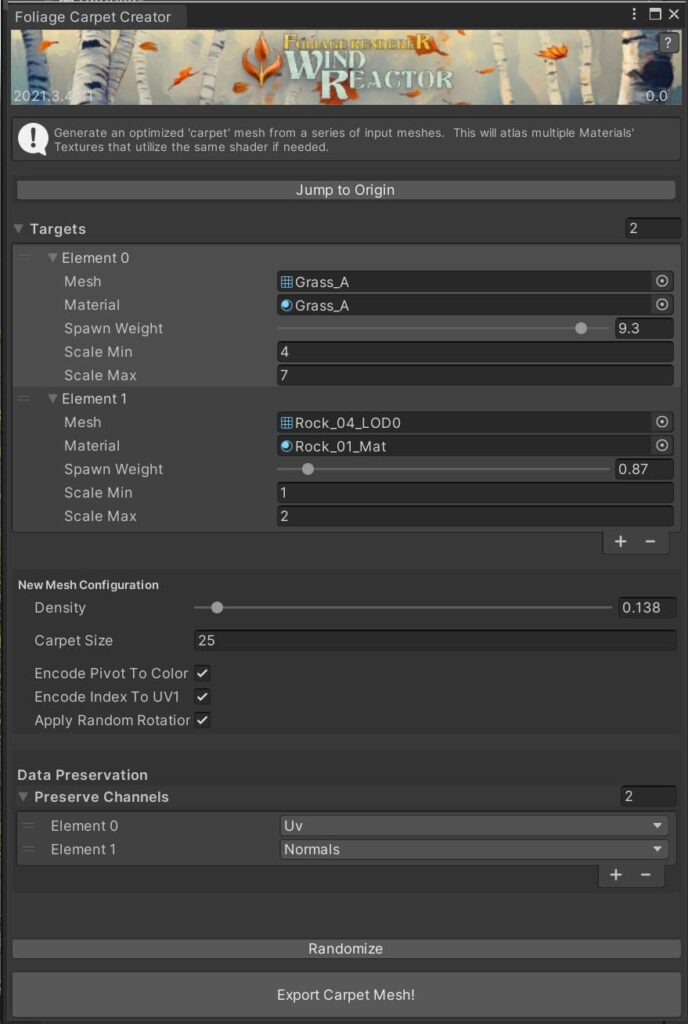
- Jump to Origin Button: This button will move your scene camera to 0,0,0, where the Carpet Creator will generate a temporary preview Mesh so you can see the output you will receive.
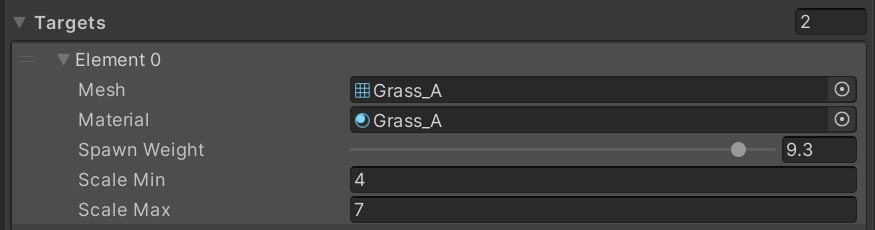
- Targets: Here you will add Meshes and their Materials from your Project.
- Mesh: The mesh to instance and combine.
- Material: The material configuration to use for these meshes. NOTE: All of the targets you wish to combine can have their own Material but MUST have the same Shader.
- Spawn Weight: How likely this mesh is to spawn relative to any other meshes.
- Scale Min: The minimum Scale to use.
- Scale Max: The maximum Scale to use
- New Mesh Configuration Settings
- Density: How many meshes should we spawn in the defined area.
- Carpet Size: How many meters is each side of the resulting carpet.
- Encode Pivot to Color: Bakes the local pivot value of each instance into the Color channel of the final mesh. This can be useful in custom Shaders for Billboarding or other effects.
- Encode Index to UV1: Bakes the index number (0 to N) into the UV1 Channel of the final mesh. Another useful tool for some Shader effects.
- Apply Random Rotation: Should the instanced meshes be randomly rotated around their Y axis? In most cases you will want this on. For special camera configurations or Billboarding Shaders disable this.
- Data Preservation
- Preserve Channels: An array of Mesh data elements to preserve, if any. (UVs, Color, Normal, Tangent, etc) Any channel defined here will be copied to the new mesh.
- Randomize Button: Generates a new Mesh on click.
- Export Carpet Mesh: Exports the preview mesh and creates the following assets: new mesh, new atlas textures (if necessary), new material (aggregates values and keywords, and assigns the atlas textures if necessary), new prefab with a Mesh Filter and Mesh Renderer with the mesh and material assigned.
How to Use
- Launch the Foliage Carpet Creator Editor Window by navigating to Window > Foliage Renderer > Foliage Carpet Creator.
- Use the ‘Jump to Origin’ button to navigate to the preview mesh area at 0,0,0 in your Scene if necessary.
- Setup your Target Meshes with Meshes and Materials from your Project
- Hit ‘Randomize’ till you like the result
- Hit ‘Export Carpet Mesh’ and choose an output directory for your new assets.
Extending Foliage Renderer Wind Reactor
You can add additional Wind Reactors by inheriting the Wind Reactor Base class. Then you will want to override the functions relevant to the behavior your Wind Reactor needs to cover.
For simple cases, where you only need to turn on or off something make sure you address these functions:
- Activate(float intensity)
- Called when the Minimum Intensity is met
- Deactivate(float intensity)
- Called when the Minimum Intensity is not met or the GameObject is Disabled
For more complex cases where you will want to override:
- Apply(float deltaTime)
- Passes in the time since the last update
- Used the cachedIntensity property (float4; XYZ describes the wind direction, W is the current intensity) as necessary
Reference the included WindReactor Classes as further examples to help guide your extension.
DISCLAIMER
We can’t make any promises that your custom extension will be as fast as the rest of FoliageRenderer or fast at all. A lot of the secret sauce of Foliage Renderer’s speed is in doing this list generation extremely efficiently. If you experience performance issues with your extensions, carefully analyze your profiler to pinpoint the issue before asking for help.