
15 Feb Foliage Renderer Documentation
| This documentation is for FOLIAGE RENDERER 1.4.x and EARLIER. Most likely, you have migrated to FOLIAGE RENDERER 2.x FR 2 does everything FR 1 did but with slightly different (more scalable) architecture. If you have FR1 and would like to upgrade to FR2 you can do so, completely FREE! Just jump in the DWD Discord and redeem your invoice with the GithubBot. For help with FOLIAGE RENDERER 2.x checkout the Documentation HERE |
The Foliage Renderer is a GPU driven rendering system for drawing large numbers of instances in the world, without the overhead of using GameObjects. It uses a minimal amount of CPU processing, moving tasks like LOD calculation, and occlusion culling to the GPU. It can speed up rendering of Unity Terrain trees and details substantially on both the CPU and GPU, while adding custom features that allow for better looking scenes.
Getting Started
Be sure to check out this Walkthrough Video if you are just getting started with the Foliage Renderer.
Limitations and Requirements
The Foliage Renderer requires Shaders that are compatible with its custom format. It can, however, patch many shaders automatically.
A Shader with support for all the shader features used by this package is included (wind, terrain aligned details, terrain albedo tinting, instancing), but if you need a more comprehensive Shader the Better Lit Shader 2021 contains support for all of these features as well. For high quality vegetation specific Shaders, we’d recommend the Vegetation Engine, which has full support for Foliage Renderer.
Foliage Renderer supports up to 4 LODs per object. CrossFade mode on LODGroups is supported – Speed Tree cross fade and animate crossfade are currently not supported. LODs must be uniformly scaled.
Foliage Renderer requires opaque or clipmap based Shaders, as it does not sort the resulting draw calls for alpha.
Technical Support
Technical Support is handled via the Dicewrench Designs’ discord group. Please read the documentation before seeking support, as many questions are already answered within.
Setup
Setting up the Foliage Renderer for your scene is trivial – after installing the package there are two simple steps to follow.
- Ensure the Culling Compute Shader has been constructed for your Project. It will be generated automatically and saved in ‘Assets/JBooth/FoliageRenderer/Resources/‘.
- If no Shader was generated, in Unity’s File Menu, go to ‘Window/Foliage Renderer/‘ and Select ‘Validate Culling Shader‘.
- Open your scene with a Terrain in it and go to GameObject/Create Foliage Renderer. This will add several new objects and components to your scene.
- Each Terrain Object will get a Terrain Foliage Provider component added to it.
- An Indirect Renderer will be added to the Scene.
- A Foliage Renderer object will be added to the Scene with the Terrain Foliage Renderer component added to it.
Automatically Converting Shaders
If your Shaders are not compatible with Foliage Renderer, your scene may look rather odd right now. Select the Foliage Renderer GameObject that was created. At the top will be an interface for patching Shaders:
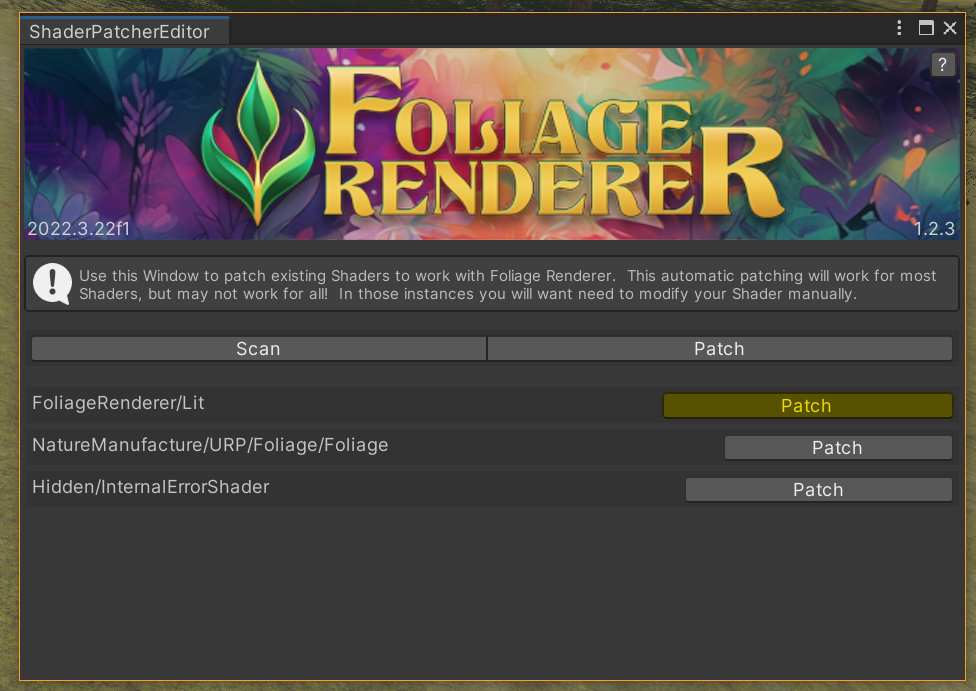
When you press the scan button, it will find all of the Shaders used in your Terrain’s tree and detail objects and list them along with a button to fix them or repatch them. Pushing the button will create a copy of the Shader, with _FR appended to the file name. It will also remap any materials in the objects to use the new Shader. When you choose to Patch Shaders, you will be prompted by a dialog to choose if you want to create a Shader Patch Report ScriptableObject or not. If you do, this report will be placed in your Assets folder detailing each Shader, what new Shader was created to replace it, and every modified Material, with controls to easily find those Materials or restore the Materials to the original Shader.
The Patcher will attempt to modify these new shaders to be compatible with Foliage Renderer. It is possible to heavily obfuscate Shader code, so we can’t guarantee the Patcher will automatically resolve every Shader it will fix many.
Note that if you are authoring Shaders yourself, you might want to include this code directly. Inside the package you will find a .cginc file and Shader Graph Node to make this easy. If you are authoring Shaders in Better Shaders, it already includes a stackable for Foliage Rendering instancing.
For a complete look at Patching and Fixing Shaders, click here.
Now that our Shaders are compatible, we can dig into those two objects added to the scene.
Indirect Renderer
The Indirect Renderer is the rendering system, which uses GPU driven rendering to render large masses of objects in minimal draw calls.
The component only has a few options. First, you can turn Shadow Frustum Culling on and off. The Shadow Culling is only done for a single, Directional Light – such as when used for outdoor scenes. If you have lots of other shadow casting lights in your scene, you may have to turn the Shadow Frustum Culling off.
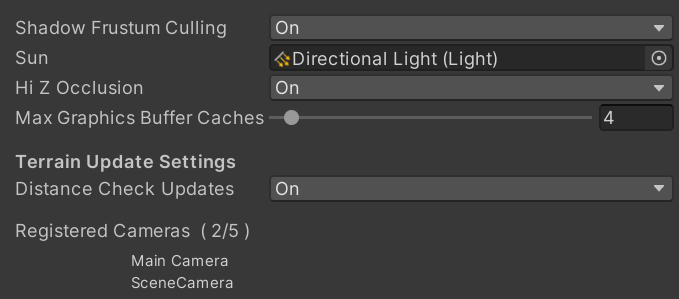
It will auto detect which Light it thinks is the sun in your scene, which is used to prevent shadow casting objects from being culled when out of the visible frustum.
The Max Graphics Buffer Caches allows you to trade off more memory usage for less re-creating of graphics buffers. Recreating graphics buffers can cause inconsistent frame rate (hitches), but takes less memory since the buffers are sized exactly as needed. When buffer caches are used, the largest buffers are kept around and reused.
You can also enable and disable Hi-Z Occlusion Culling. Hi-Z is an occlusion culling system which works entirely on the GPU. It works by using the depth buffer from the scene to trivially reject objects which won’t be seen. This can massively reduce the number of instances which need to be drawn when there are good occluders in the scene, but comes at the cost of needing to render a depth buffer for your scene. In many cases, you might already be doing this for other effects, in which case the cost of using Hi-Z occlusion is relatively cheap, with large potential wins.
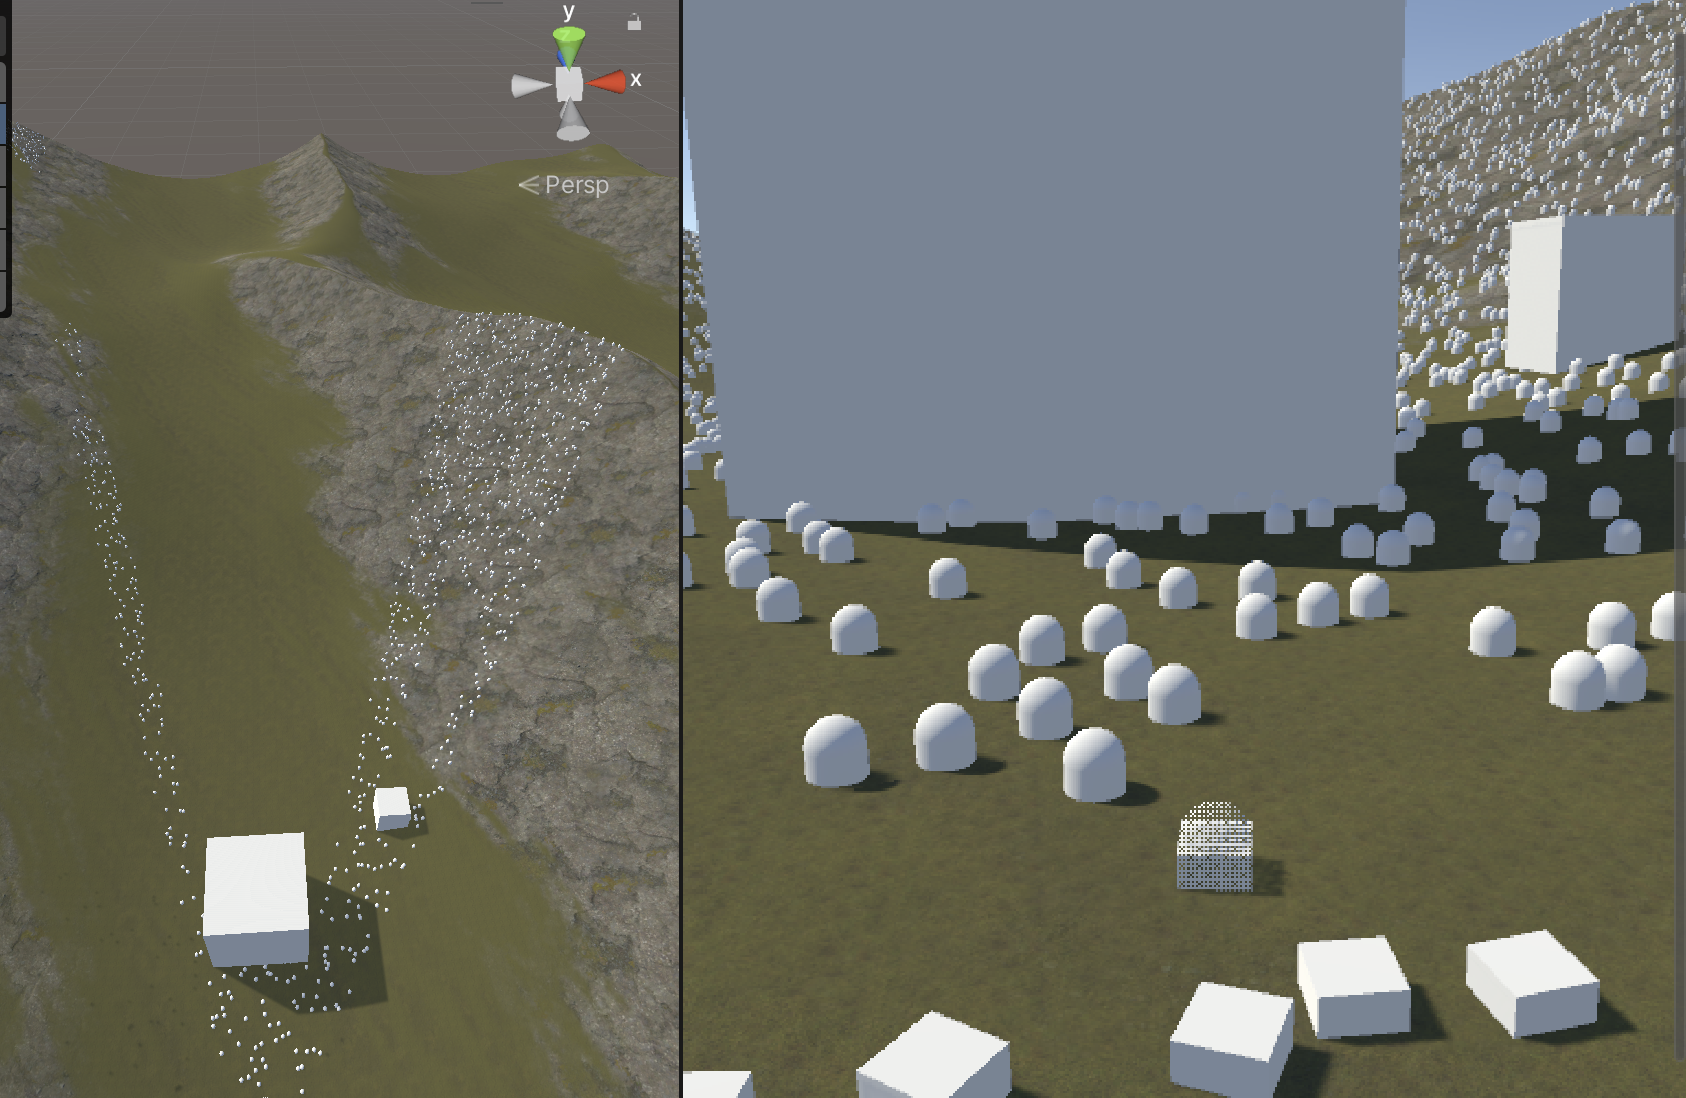
This example is taken showing frustum culling from the Camera. Any object or shadow which is potentially in view of the camera is rendered, but no Hi-Z Occlusion Culling is used.
Notice that both the boxes and the landscape itself reduce the number of instances which need to be drawn, yet from the game view perspective everything is drawn correctly. This can massively reduce the number of instances which need to be rendered, and is especially cheap if you are rendering in any mode which already generates a Depth Buffer.
Setting up HiZ rendering
Setup for HiZ Occlusion Culling varies by Render Pipeline.
- Built In Render Pipeline
- Enable HiZ Culling in the Indirect Renderer Component
- HDRP
- Enable HiZ Culling in the Indirect Renderer Component
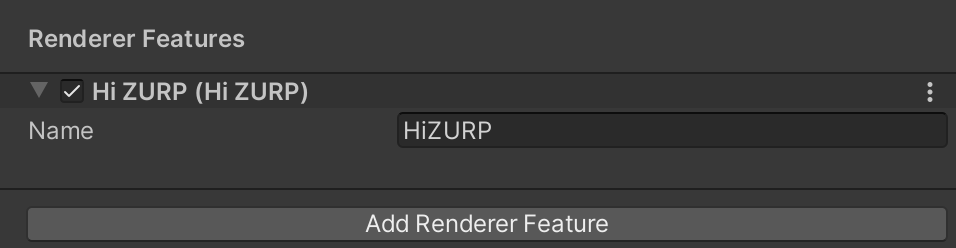
- URP
- Each Scriptable Renderer Data Object in your Project will need the HiZ URP Renderer Feature added to it. Don’t worry, we make this easy!
- On Load in the Editor the HiZ URP Renderer Feature will automatically be added to every Scriptable Renderer Data attached to a Render Pipeline assigned in your Project’s Quality Settings.
- If the Renderer Feature isn’t automatically assigned, or you modify your Quality Settings, or some other edge case, you can manually trigger this assignment. In Unity’s File Menu go to ‘Window/Foliage Renderer’ and select ‘Validate URP Data Assets‘
- If all else fails, select your Scriptable Renderer Data Asset, click ‘Add Renderer Feature’ and select HiZ URP
- Finally, make sure URP is set to render a depth buffer. Once this is done, you can enable Hi-Z on the Indirect renderer.
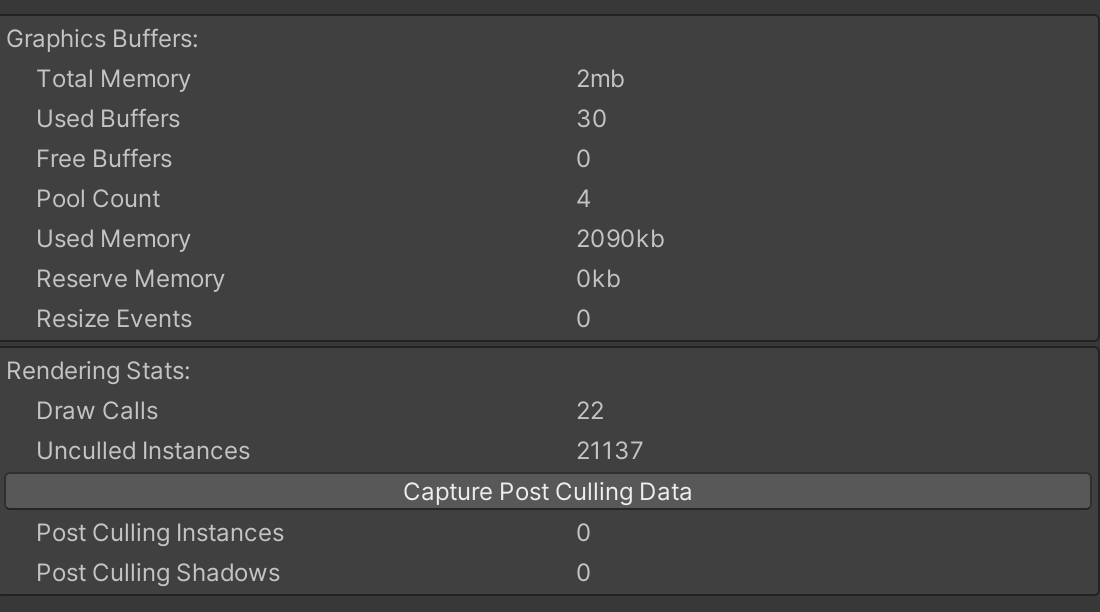
Finally there’s a section showing the stats for the system. How much memory it’s using, how many draw calls, etc. Pressing the ‘Capture Post Culling Data’ button will show you how many instances are being drawn on that frame after frustum and hi-z culling are performed. It’s often the case that this is a small percent of the total instances in the area.
Indirect Camera
The Indirect Camera component subscribes and unsubscribes a Camera to the Indirect Renderer.
Terrain Foliage Renderer
The Terrain Foliage Renderer will automatically convert Terrains in your scene to use the Foliage Renderer by adding Terrain Foliage Provider components to those objects. It also lets you provide default settings for how tree’s and details are rendered, as well as overrides for each individual tree or detail in the system.
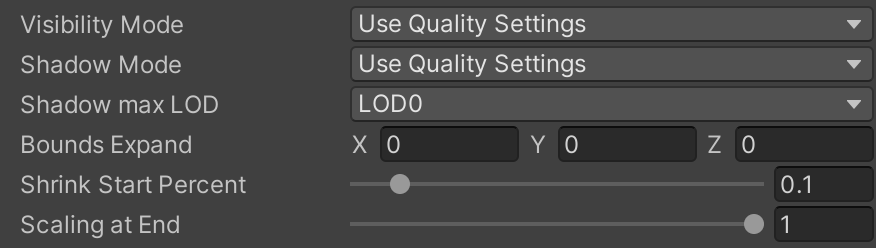
The default settings are available for Trees and Details on the Terrain. By default, the distances in which they and their shadows are drawn are read from the unity terrain and scene settings, but you can override these with your own values, even on a per instance basis.
Shadow max LOD can be used to render shadows from a different LOD than the visible model. This can be very beneficial on complex objects like trees, especially since shadow buffers are often lower resolution than the full screen and thus suffer from micro-triangle issues worse than the main scene.

Below the defaults you can select individual tree’s or details, and overwrite their settings. You can, for instance, cull instances or their shadows earlier on smaller objects. This gives you a lot of optimization control.
Detail Streaming
Detail objects on Unity Terrains are not placed objects- rather they are controlled by bitmasks. When Unity renders detail objects, it selects areas of the terrain near the camera (patches) and converts those bitmasks into objects scattered across the nearby terrain.
If converted to raw position data, an entire terrain worth of Detail Objects can consume a lot of memory (About 28mb in the demo scene). So by default, Foliage Renderer streams these areas in from Unity Terrain as they come into view. This reduces the memory use substantially. However, because Unity will never, ever, under any circumstances, fix the Terrain API, the API call to get this data allocates an array of managed memory, and are not in a rendering compatible format, and actually do not correctly handle Terrain aligned details which were added in 2022. FR will automatically convert and fix this data on the fly, but if you are pushing Rendering Distance out very far and have the memory to spare, you might want to do this once at load instead of using the streaming system.

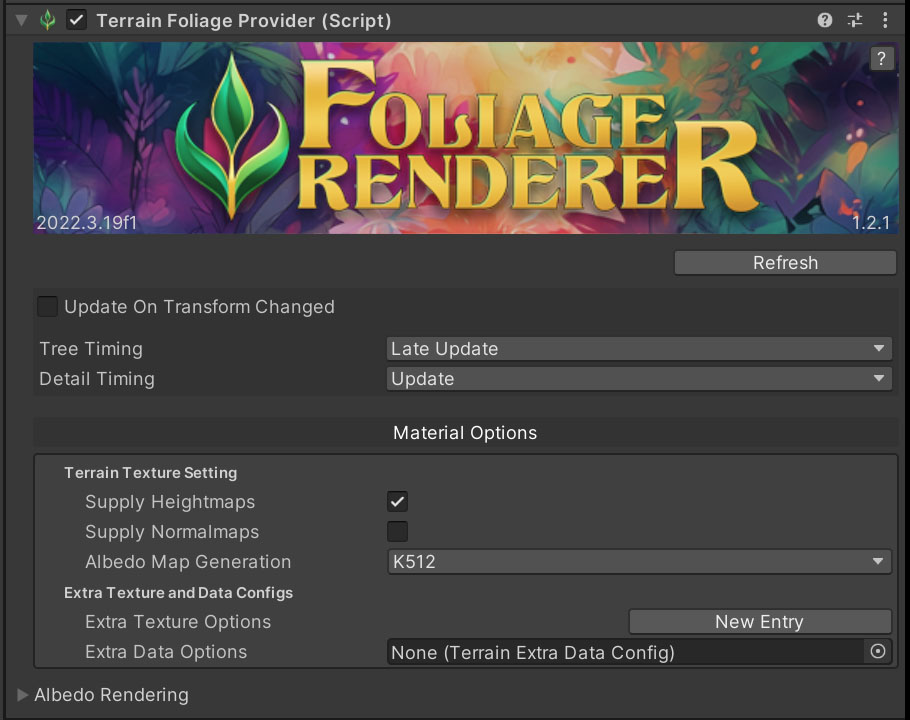
Terrain Foliage Provider
The Terrain Foliage Provider is a component that sits on a Terrain Object and scrapes the Terrain for Detail and Tree Prototypes and turns them into Draw data for the Terrain Foliage Renderer to display.
By default, Tree positions and Albedo Rendering are updated when they are flagged to refresh. This normally only occurs when the Terrain’s OnTerrainChanged callback is raised and the TerrainChangedFlags includes a relevant change flag. It can be done manually by calling Refresh() on the Terrain Foliage Provider.
The Provider has a few options you can use to fine tune when it updates information for the Renderer.
- Update On Transform Changed: When true, Tree Prototypes will be refreshed on the next specified Update Timing (see below). By default this is false.
- Tree Timing: Enum to indicate what Update step (or not at all) Trees should be processed. By default this is set to LateUpdate.
- Detail Timing: Enum to indicate what Update step (or not at all) Trees should be processed. By default this is set to Update.
Material options
The Material Options rollout provides you controls to send extra data to the Materials of the instances rendered on the Terrain. Combined with custom shaders, this can be a powerful system to enhance your scene.
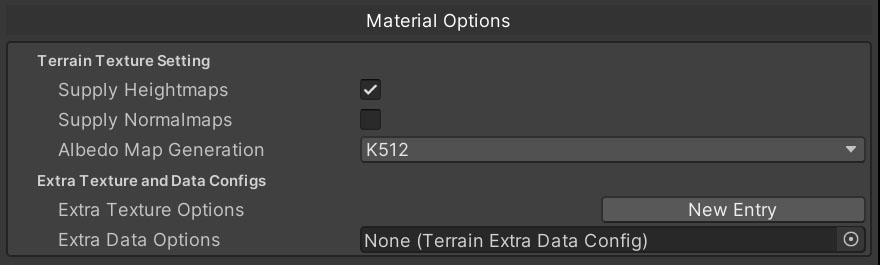
- Terrain Texture Settings: These options allow you to provide height and normal maps from the Terrain, or generate an Albedo map of the Terrain and send them to your Materials using Unity’s standard naming conventions. Let’s examine how these can be used.
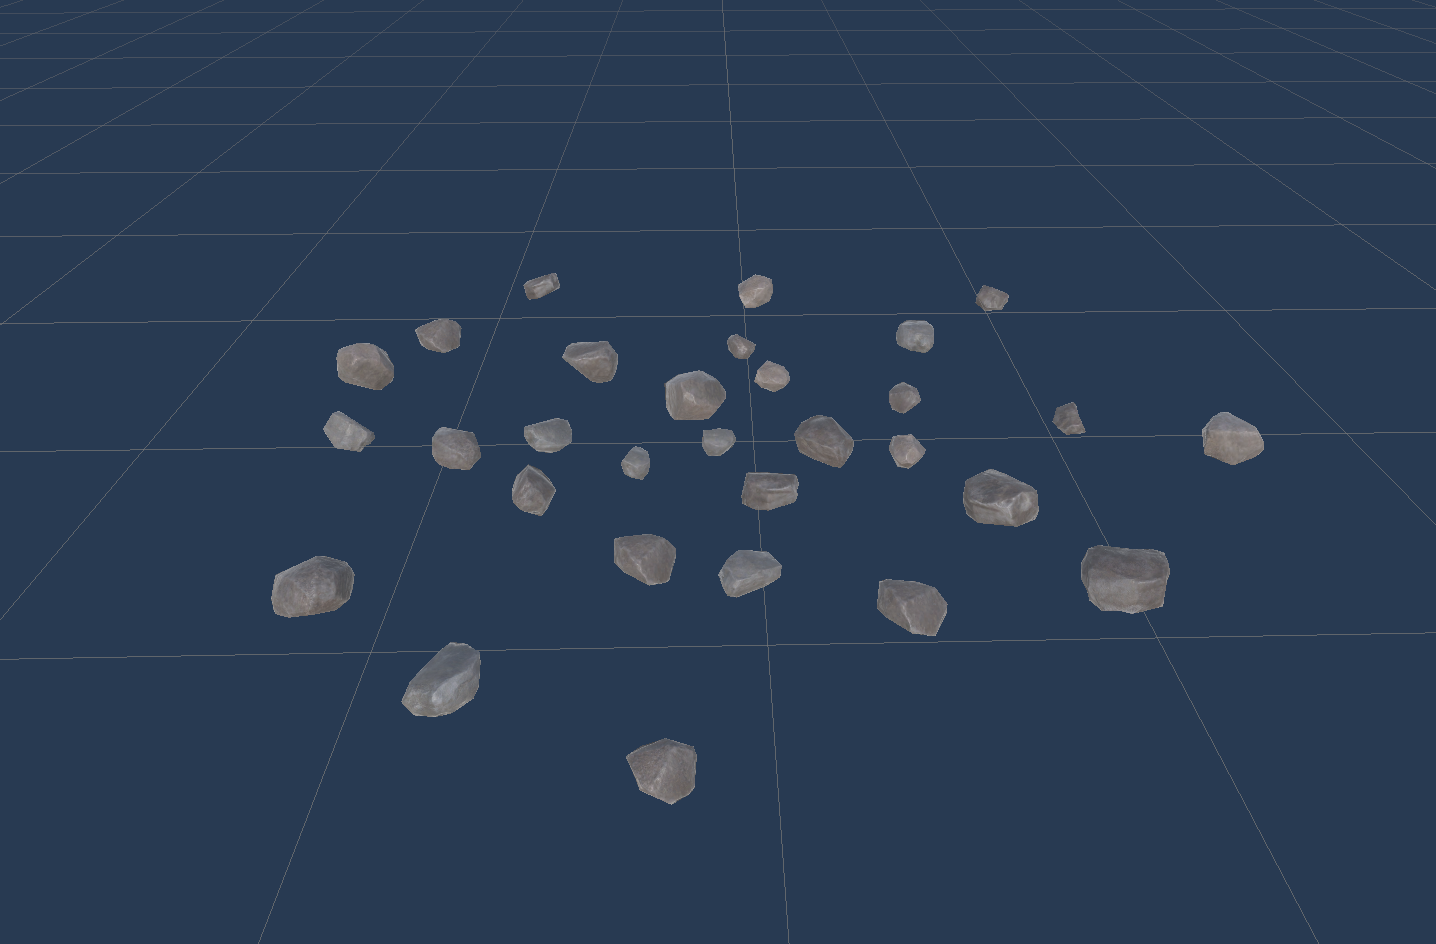
This is an example mesh of a few dozen rocks, which could be easily placed on a flat terrain. However, if you try to use this as a detail object on a terrain, it will look like this:
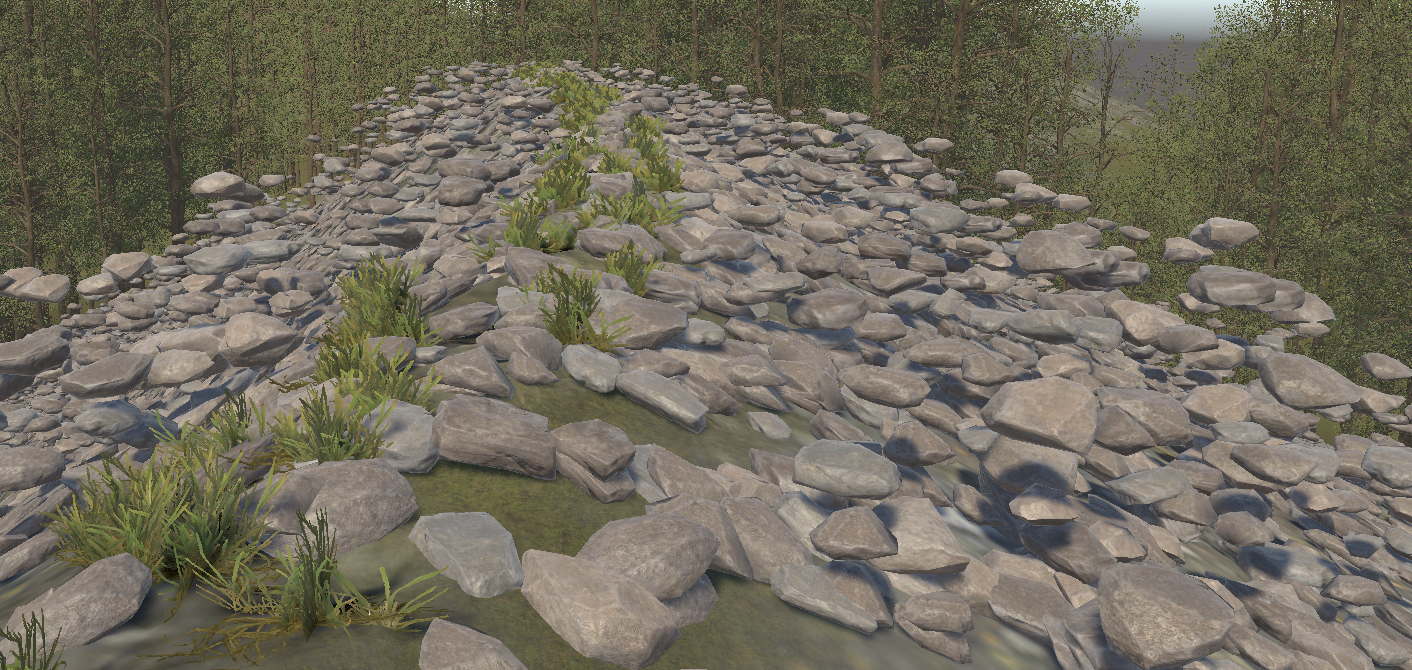
The rocks float, because they don’t follow the terrain. In Unity 2022, Unity added a feature to align objects to the terrain – however, this only happens at the object’s pivot point, which means rocks far from that center still float, or end up inside the terrain.

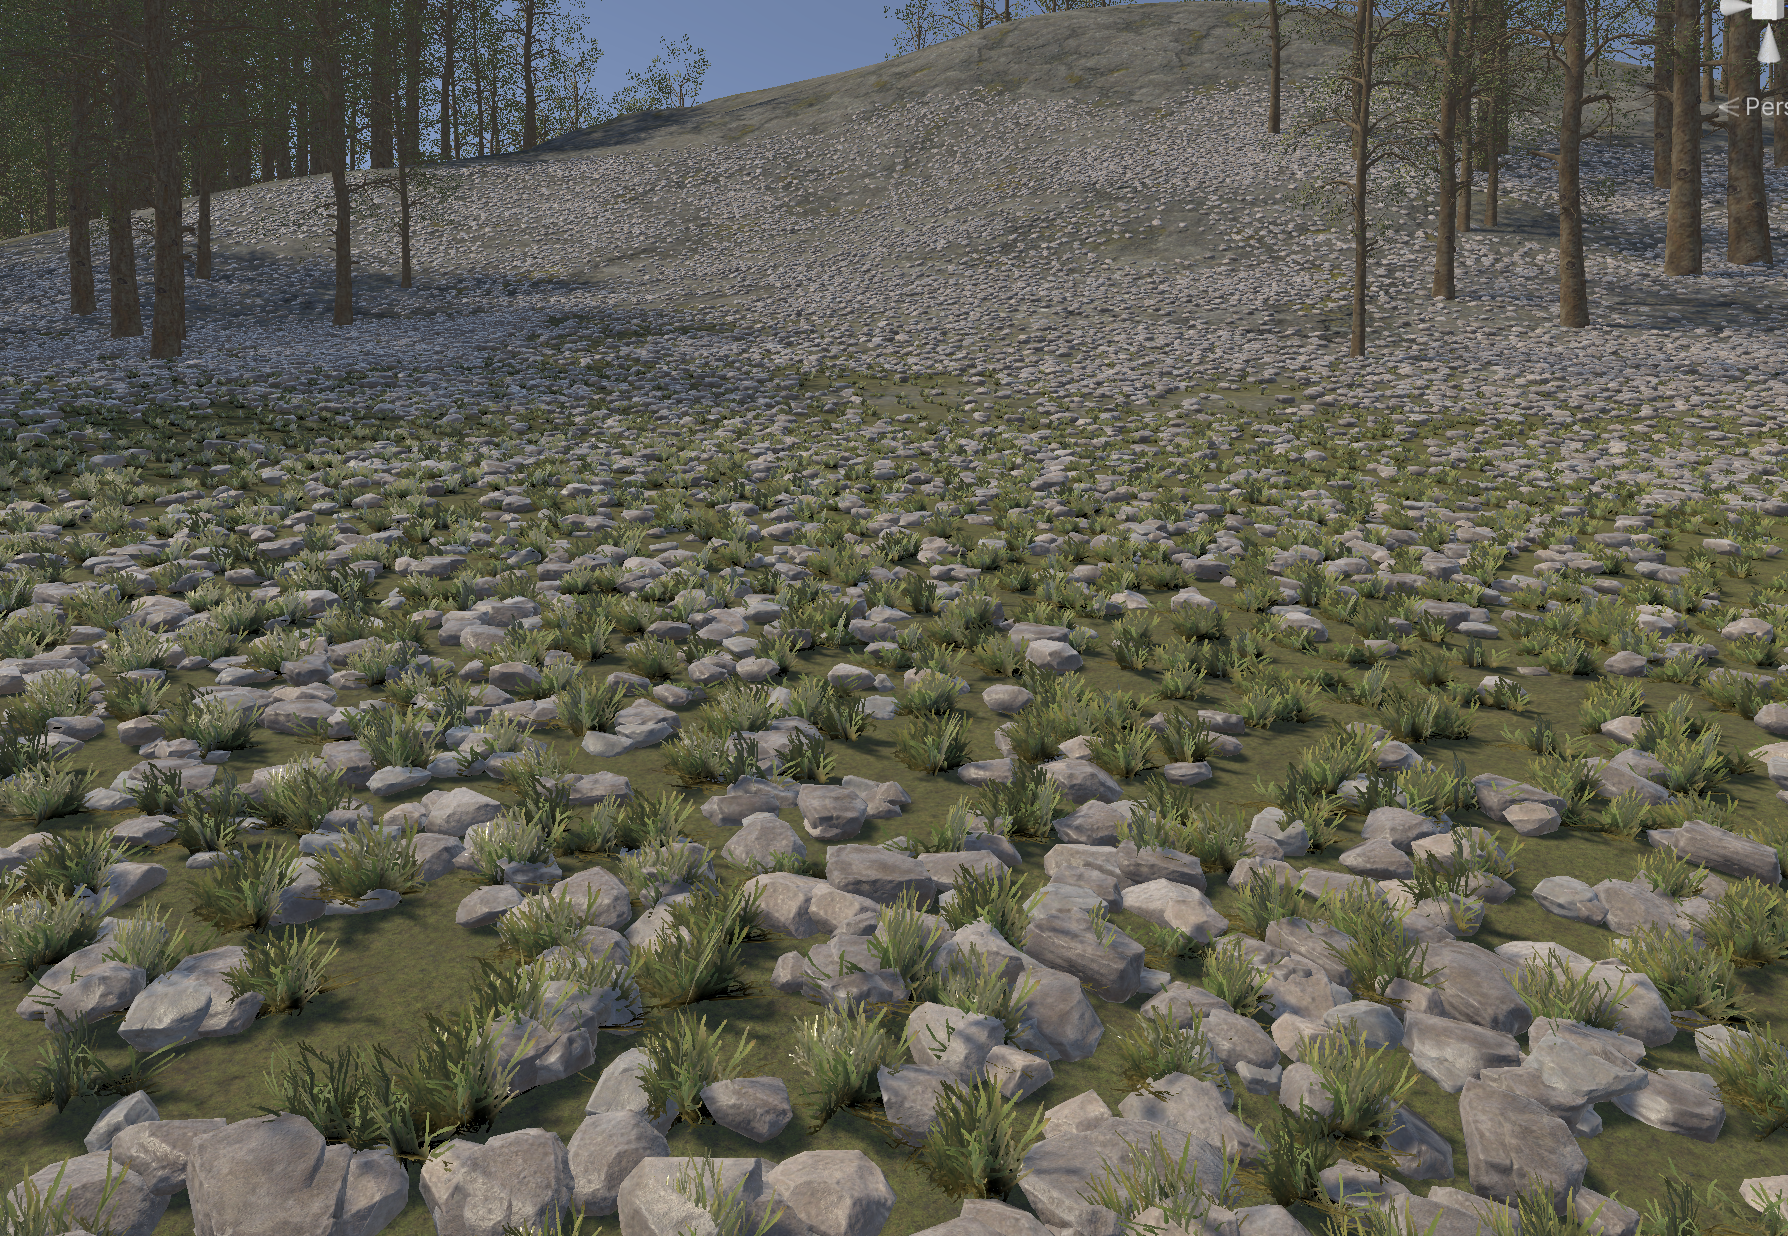
Using the height data from the terrain, we can conform a mesh to the exact terrain geometry. This makes it possible to use meshes like this, and lots of photogrammetry geometry that wouldn’t be suitable for terrain otherwise.
Note, however, that there is no way to know when the Unity terrain will reduce its detail level, and the shader will always sample from the height map. At enough distance, this can cause objects to be overwritten by the terrain in small patches when low resolution terrain covers them.
- Extra Texture and Data Configs
You can also pass the normal or albedo information from the Terrain to the materials on the tree and detail objects. Note that the albedo is generated directly from the diffuse textures, so cannot take into account custom Shaders used on the Terrain, which might have controls for things like tint.
However, this area also has another control, allowing you to pass arbitrary textures associated with the terrain to the objects on the terrain. For instance, you might pass an albedo map of the terrain baked out from MicroSplat to blend the grass towards the terrain color instead of using the built in one. This would fully support tint, or any other data you might want to bake out and use in your Shaders. To see how this is configured, we can setup the albedo feature manually.
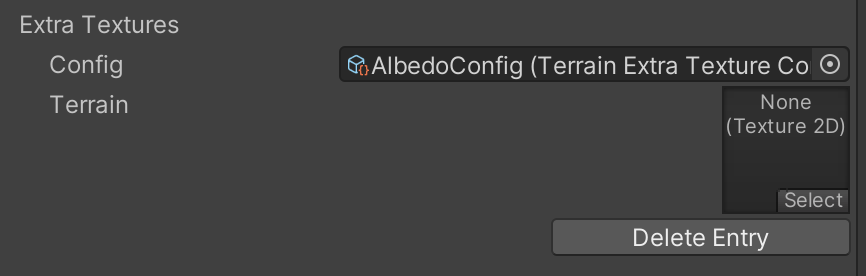
Once you add an entry, you can supply it with a config that tells the system what properties your Shader has for the textures. You can make a config from the right click create menu in the project window (Create/FoliageRenderer/Create Neighbor Property Config).
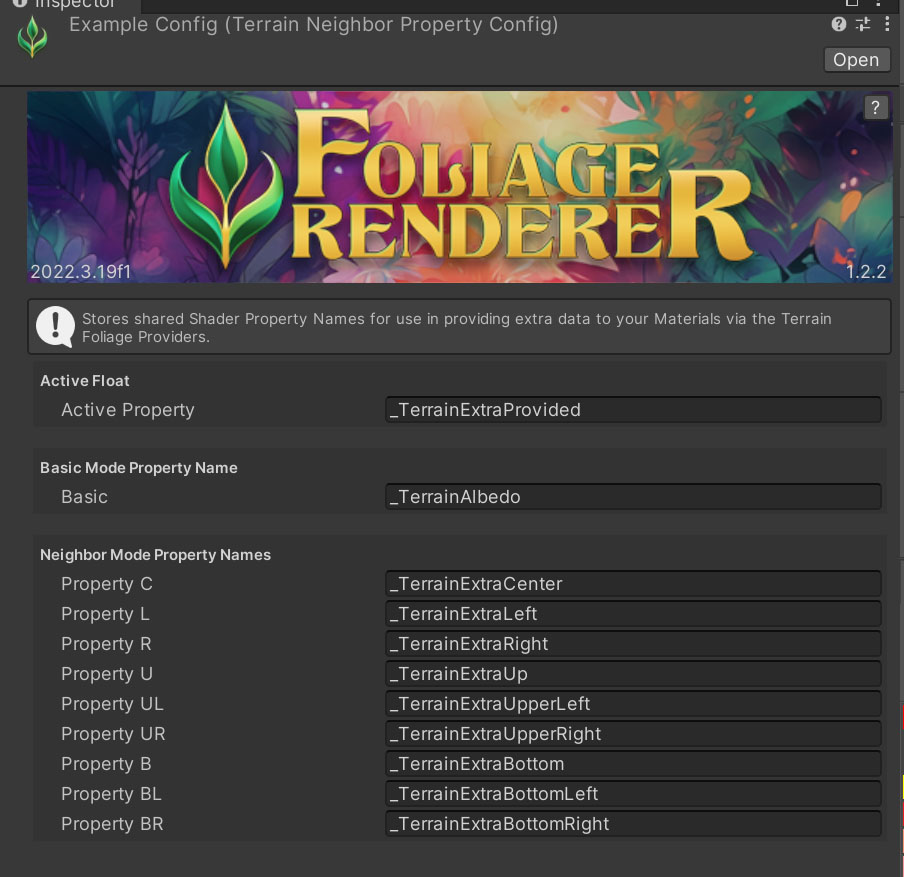
The active property will be set to 1 when this config is used, which can be used to branch on the feature via a keyword or branch. The textures will be set on the properties you provide in the other fields. You can set a basic Shader Property Name which will be used if you don’t need neighboring data (see below). And naming conventions for neighboring data, allowing you to blend data across Terrain seams.
The included example Shader can use this config if you’d like to tint the albedo of your terrain objects using arbitrary textures instead of the built in terrain albedo map. An example might be to specify the color of the flowers in an area, pass it wind directional data, or pretty much any other data you might want.
If you’re interested in writing custom Shaders that use these features, you can look at the Stackable_TerrainAlignedDetail.surfshader in the Shaders/BetterShadersSource directory. It contains both the feature to align details to the Terrain, and tint them based on the provided maps.
 The other config you might wish to assign is a Terrain Extra Data Config. This allows you to pass some of the key TerrainData values to your Shaders and Materials. Each of the data types; Size, Height, Position, and Y Offset; can be set to Disabled, Basic, or Use Neighbor Modes. What Shader Property these will be assigned to is based on the Terrain Neighbor Property Config you assign next to the Mode.
- Disabled: No data will be passed to the Materials.
- Basic: The corresponding Neighbor Property Config ‘Basic’ Property Name will be used.
- Use Neighbors: Neighbor Property Names will be used and any available Neighbor TerrainData will be assigned.
Menu Options
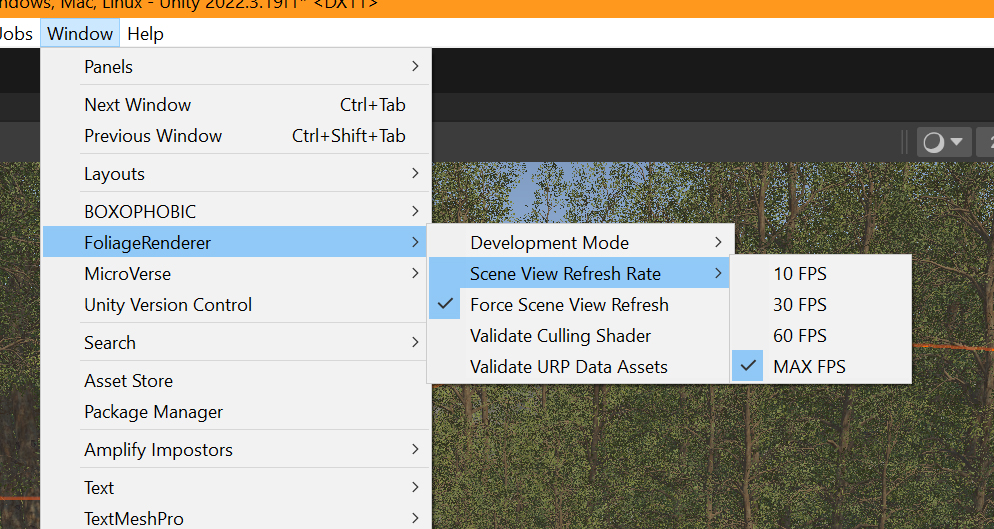
Several useful features are accessible in the Menu. You can find them via ‘Window > FoliageRenderer >’
- Force Scene View Refresh: Enable or Disable to control updating the IndirectRenderer when the Scene View Changes.
- Scene View Refresh Rate: Toggle the Scene View Refresh Rate to an FPS value that works for you to minimize unnecessary GPU overhead while working in the Unity Editor. (By default the Unity Editor runs about 100 FPS, but at an inconsistent rate.)
- Validate Culling Shader: This option will run the validation process that builds the Foliage Renderer Culling Shader automatically at startup, just in case.
- Validate URP Data Assets: This option will only appear when you are in a URP Project! Like Validate Culling Shader this runs the validation process that tries to attach the Hi Z URP Renderer Feature to every ScriptableRenderPipelineAsset connected to your Project’s Quality Settings.
Benchmarking
A common refrain we hear is people adding FR to a scene and looking at the FPS and saying “the FPS wasn’t improved”. This is usually because people don’t understand what their actual bottleneck is, what Indirect Renderer’s do, or the difference between GPUs and CPUs. They also tend to test on large scenes with no gameplay, in which the CPU has plenty of time to do rendering work.
The most basic form of rendering will submit one draw call per mesh and material it encounters. So a tree with bark and leaves on separate materials would be two draw calls. 10 trees would be 20 draw calls, and so on. Unity terrain uses a form of instancing to reduce this- allowing for up to 1023 of these draw calls to be combined (though on some hardware, it’s only 512). So if you have 10 thousand grass objects being drawn, it would take 10-20 draw calls to draw them. With Indirect Instancing, there is no limit to the number of items you can submit in a single draw call. , so all of these can be rendered in a single draw call.
When a frame is rendered, both the GPU and CPU must finish their work before the next frame can be rendered. The CPU needs to submit all the draw calls, and the GPU needs to render them, but the GPU can start rendering as soon as the first draw call is submitted while the CPU continues to submit new draw calls.
![]()
In the Unity Profiler line pictured above, you can see when the CPU is simply waiting for the GPU to finish. Here it’s spending 13ms just waiting for the GPU to finish rendering. That’s 13ms that could be used to run gameplay code, physics, etc. Often in scenes which run at the same frame rate, you’ll see the CPU waiting for the GPU for a lot longer than it does using Unity terrain rendering, simply because Unity terrain is spending a lot of CPU time to submit additional draw calls. Under these conditions, FR is faster, but the frame rate is the same, because your scene is not using a lot of CPU time.
Further, people usually test on scenes designed for Unity terrain. These often feature short draw distances on grass, because when pushed out to far distances, everything renders slow. The included example scene has the draw distance set to 250m for terrain details- this is the maximum Unity terrain allows, though FR can go much higher. The frame rate in this example is over double what it is using the Unity renderer, because the Unity renderer submits way too many draw calls to be performant with that view distance. In one view of this scene, there are over 200k instances – Unity terrain would batch that as somewhere between 200 and 400 draw calls, while FR is able to do it with just 22 draw calls. FR’s culling also reduces the actual number of draw instances to 29k. That’s such a large savings that it helps both the CPU and GPU.
Extending Foliage Renderer
You may want to draw Meshes without relying on Terrain and the TerrainFoliageProvider components to draw details.
The core of the system is the IndirectRenderer component, which can be used to render all kinds of things, not just terrain objects. To render objects with it, you simply register and unregister List<Draw>’s with a unique id.
The Draw class wraps the meshes, materials, and RenderParams to be drawn for a given Prefab (myPrefab).
For example, let’s imagine we have a list of Transforms (myTransforms) we want to draw a Prefab at. In order to render these objects we’ll need to do a few things:
- Create a NativeList<Matrix4x4>s (myMatrices)
- For loop over the myTransforms list and add a new Matrix4x4 for each Transform using…
Matrix4x4.TRS(myTransform[i].position, myTransform[i].rotation, myTransform[i].localScale)
- For loop over the myTransforms list and add a new Matrix4x4 for each Transform using…
- Create a List<Draw> to add your Draws to.
- List<Draw> myDraws = new List<Draw>(); You probably want this on whatever class is adding the draws, not creating it over and over.
- Calculate the World Bounds (myBounds) for all of your Draws.
- Loop over the Transforms, find the smallest and greatest dimension along each axis.
- Do some math to get the center.
- Create a Bounds using that data.
- You may wish to expose or define some custom RenderParams.
- You may wish to expose or define some custom DrawOptions
- DrawOptions is a proprietary class from FoliageRenderer that recreates the functionality of Unity’s Terrain Detail Draw Options (Unity sealed that class………… don’t ask me why, nothing makes sense).
- Use the static Draw.AddToDrawList funtion to populate myDraws.
- Draw.AddToDrawList(
prefab: myPrefab, // the prefab you want to draw
List<Draw> drawList: myDraws, // the list of drawables you want to add to
NativeArray<Matrix4x4> mtxArray: myMatrices, // places/rotations/scales to draw instances at
RenderParams renderParams, // rendering parameters (shadows, etc)
Bounds worldBounds: myBounds, // bounds for all instances
DrawOptions drawOptions); // custom draw options to use
- Draw.AddToDrawList(
- Now you are all set. You can show your objects now by calling…
IndirectRenderer.Register(
string id, //a unique ID for your drawer component
List<Draw> drawList: myDraws); //the draw list we setup already - And you can stop drawing the objects anytime with…
IndirectRenderer.Unregister(
string provider, //the same unique ID for your drawer component you used to Register it
DISCLAIMER
We can’t make any promises that your custom extension will be as fast as the rest of FoliageRenderer or fast at all. A lot of the secret sauce of Foliage Renderer’s speed is in doing this list generation extremely efficiently. If you experience performance issues with your extensions, carefully analyze your profiler to pinpoint the issue before asking for help.
Note that there’s a version which takes precomputed Graphics Buffers as well, allowing you to bypass some of the conversion if you can have that data already in the correct format.